Hi everyone. For those who visit this blog site and don't visit my Stampin Inspirations blog site, I just wanted to let you all know that I'm on vacation and won't be posting any projects until I get back from my trip.
I'm in Virginia right now. . .and will be heading to Washington D.C. on Thursday. I've never been to Washington D.C. so I'm excited to tour the area. I'll take pictures and post them on my blog sites!
I brought my laptop with me so I can surf the web on my down time. We really didn't do anything today but shop. We're heading to the Aerospace Museum tomorrow so I'll take a few pictures of our adventure.
Until later. . .
Tuesday, March 27, 2007
Saturday, March 24, 2007
Featured Blogger of the Week - Distinctive Touches
I have a new "Featured Blogger of the Week". I chose Colleen's blog site "Distinctive Touches". Colleen's blog site is "distinctive" for sure. Her blog layout is unique and distinguishes her from other blog sites. Not only does she have a cool blog layout, she creates wonderful projects. Colleen is an avid rubber stamper as well as a scrapbooker. She is also a reporter for Craft Critique, a blog site I featured a few weeks ago. Craft Critique is a blog site focusing on critiquing craft products on the market. Check out "Distinctive Touches" today and check out her wonderful papercraft creations.
Friday, March 23, 2007
Random Card - Polished Stone - Pearl Ex

I made these two cards for a swap which by the way I'm far behind on. I'm behind on a lot of things including the laundry. We're leaving for Washington D.C. on Monday and there's so many things I need to do before we leave but awhhhh. . .I'm just so not in the mood to do anything right now. Call me a procrastinator. . .
I've never been to Washington D.C. - I can't wait to see the White House and everything else that is Washington. Because it's Spring Break, my kids and I are going to accompany my husband on his business trip to Virginia then we'll head to Washington D.C.
Anyway, back to the cards. The background was created using the Polished Stone technique. . .I used Stampin Up Hunter Green and Gable Green mixed with Adirondack Mixative in Copper.
Click Here for my tutorial of the Polished Stone Technique.
The tutorial is on a previous post not on a web page. When clicking on the link, don't be surprised to be linked to a blog post. Just scroll down to view the tutorial.
In the past, I did my tutorials directly on to my post but I found it to be too tedious and extemely slow process so I now create my tutorials on to a web page. It's so much easier and faster to create my tutorials on a regular web page.
Back to the card creation. . .to create the primary image, I used copper Pearl Ex with a mix of green. For those who've never worked with Pearl Ex. . .there's nothin' to it. Here's a quick instruction:
- Ink your stamp with Versamark
- Stamp the image on to a darker colored cardstock
- With a medium size brush, pick up a little bit of one color of Pearl Ex. In this case, I used Copper. Tap the brush and allow the Pearl Ex fall on to the stamped image.
- With your brush, brush the Pearl Ex on to desired areas of the image
- When done, with your brush, pick up another color. In this case, I used a Green colored Pearl Ex.
- Tap the brush and allow the Pearl Ex to fall on desired areas.
- Brush the second color of Pearl Ex on to desired areas including over the first color. This allows the color to mix a little.
- Spray your image with a fixative or hair spray.
That's it. Simple, huh? Well, I love the effect. It gives the image a very beautiful shimmery effect.
To finish off the primary image, I outlined the edge with copper metalic ink.
The sentiment was heat embossed with copper embossing powder and outlined the edge with the copper metallic pen.

The second card below was created in the same manner as the first card but with a different layout.


Until later. . .
Tuesday, March 20, 2007
Daily Special - Featured Stamps - Fiskar Clear Stamps - Cards for Sandy

Hey Sandy, I made these cards for you. Sandy had emailed me because she had bought a few of the Fiskar Clear Stamps that I had done a product review a few weeks ago and she wanted samples of cards that could be created with the stamp sets.

I made two cards using the Fiskar "Thank You" clear stamp set. The stamp set is very versatile and it has a lot of stamps to work with.


Not much commentary to this post because I need to get ready for dinner. I just wanted to post the cards so I can email Sandy and let her know that I made a few cards so she can take a look at the sketches I did and hopefully, give her a few ideas on what designs she can do with the stamp set.
Until later. . .
Monday, March 19, 2007
Daily Special - Anything But Cards - 4x6" Chipboard Scrapbook Album

Today's Daily Special is "Anything But Cards" and I decided to create a mini scrapbook album using 4 x 6" chipboard. I am happy to tell y'all that I woke up with a clear head after over a week of being stuffed up and battling a cold. I feel free. Ha! I know I'm being silly but I really couldn't work on anything this whole week and it just feels good to be able to.
Back to the scrapbook album. I created this mini scrapbook album using (5) 4 x 6" chipboards. I covered the chipboards with scrapbook papers with a "Spring Theme". The scrapbook papers are made by DCWV - Spring Value Pack. I always buy value packs because of the variety and the cost. I never ever buy individual scrapbook paper. It's just way too expensive and I can't see myself cutting them up knowing the cost.
I punched a hole at the left corner and used a leaf binder ring to hold the scrapbook album together. To create the design of each page, I used scrapbook embellishments and rubber stamps.
It's funny because I actually finished this scrapbook album in a few hours and considering there's a total of 9 complete pages plus the back, I finished it pretty quickly. I find it interesting because if I was creating cards, I would have made 9 of them in a few hours. I've never completed 9 cards in a few hours - it would probably take me two days to complete 9 cards. Why does it take me so long to make a card and only a few hours to make 9 full pages of a scrapbook album? It doesn't make sense to me. I wonder if other stampers find themselves in this situation?


Anyway, it feels great to be back! I hope to be back to making all sorts of projects now that I'm almost back to normal!!
Until later. . .
Saturday, March 17, 2007
Winner of my Blog Candy

Congratulations to the winner of my blog candy. I sent an email to the winner who happen to subscribe to both of my blog sites so I'll be sending a few extra goodies. Please check you email to see if you are the winner.
Here is a partial email address of the winner - "coombdav".
Obviously, the whole address is not shown but just in the case the person didn't read their email but came to visit my site. . .

Thank you for your participation and for subscribing to my blog sites! I really do appreciate it. There was a total of 217 participants in this blog candy, either subscribing to one of my blog sites or both! Wow, this was really fun.
Here are pictures of my daughter pulling the email address of the winner.
I hope y'all have a wonderful weekend and again, thank you for being such wonderful readers!

I'll Announce the Winner Today
'm sorry I didn't announce the winner for the Blog Candy yesterday as promised. I had a bad day yesterday from this cold I have. I'll have my daughter pull the winner out of a hat and I'll take pictures of the process. I will then send the winner an email to let the person know they won. I will post an announcement on my blog that I sent the winner an email.
My daughter is still sleeping so when she gets up, we'll pull the the winner.
My daughter is still sleeping so when she gets up, we'll pull the the winner.
Thursday, March 15, 2007
Random Cards - CTMH Stamps - Prismacolor Pencils and Gamsol

I did not post anything for the past few days because I've been sick with a cold. I feel a little normal today. I'm not very good at being sick. I'm always surprised when people are still able to function when they have a cold. I'm not that way at all. Personally, life stops for me when I have a cold or when I'm not feeling well.
Now on to the subject of rubber stamping. I know. . .there's a lot going on with the card I created. This is what happens when you can't seem to make a card design work. . .you just keep adding elements in hopes it will work out in the end. I'm not sure it did in this case. Anyway, I tried. . .I wasn't going to blog this card but why waste it, right? Anyway, I colored the image using Prismacolor Pencils and Gamsol. Click here for the tutorial.
For those of you who have not purchased Prismacolor Pencils. . .well. . .they're expensive. I've used other colored pencils and they work well with Gamsol, therefore, it's not necessary to purchase expensive pencils. There is a slight difference in the vibrancy and boldness of the colors but in the end, with a little bit more extra coloring, you can achieve the same vibrant colors of Prismacolor Pencils with regular color pencils. If you don't mind spending double the amount for Prismacolor Pencils, then I would recommend them but if you don't plan to use the pencils regularly, then it may be something that you may not want to invest a good chunk of your money on.
Card Detail:
Stamp: Close to My Heart
Paper: Stampin Up Orchid Opulence, Lovely Lilac, Provocraft Scrapbook Paper
Ink: Prismacolor Pencils, Lovely Lilac
Accessories: Fiskar scallop template, Grosgrain ribbon, Card Connection Charm, Making Memories Paper Daisy, Large Circle Brad, Organdy ribbon, Silver metallic Cord
Technique: Prismacolor Pencils with Gamsol
Try this sketch challenge:


It must be the stamp because again, I added all sort of stuff to dress up this card. Some stampers like busy cards, I tend to not like my cards too busy. Again, like the first card a lot of stuff are going on with this card. Sometimes you just need to stop at two or three design concepts but I just kept going.
Card Detail:
Stamp: Close to My Heart Stamp
Ink: Prismacolor Pencils, Stampin Up Bravo Burgundy
Paper: Stampin Up Cameo Coral, Orange (Unknown brand), DCWV scrapbook paper
Accessories: Dashes, Dots & Checks ribbon, Stampin Up Wrought Iron Corner Slot, Fiskar Scallop template

Monday, March 12, 2007
Daily Special - Technique Day - Coloring on Vellum
 Here is a simple technique using vellum. Because new stampers are just learning and sometimes are unsure of how to use a product, they don't use it. Not everyone has the money to experiment on expensive materials. I'm for one have a very difficult time wasting any materials and sometimes when you experiment, well you inevitably waste a few of them. To save new stampers the trouble of having to waste their materials, I'll from time to time post basic tutorials.
This tutorial is a basic coloring technique on vellum. Honestly, its not like there's a lot of ways to color on vellum. Coloring on vellum is quite limited. Don't use watercolor because well, once it dries it will surely warp. 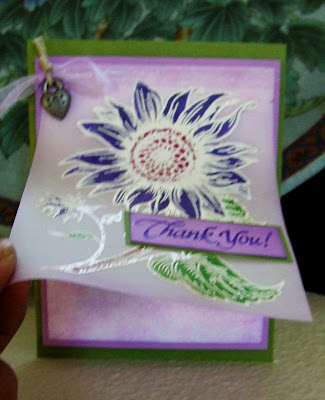

How do you attach vellum on to the cardstock? The scrapbook stores sell vellum tape which is a clear tape. Transfer tape by 3M works well too. You may also use any snail tape. It will show up a little through the vellum but you can remedy that by adding brads or ribbon to cover it up.
Never color the front of the vellum because well in my opinion, it looks ugly. Inks don't color well on vellum but if you color the backside, then the color strokes don't show up as much as it would if colored on the front side.
Just on a personal note. I got over a nasty cold two weeks ago. I typically don't take medication when I have a cold because I found that medication stops the body's own natural healing process. In the past I've taken medication and I've always ended up with some sort of secondary infection such as an upper respiratory infection - chest congestion, cough, etc.
Medication halts the process of your body own defenses to clean out the virus or bacteria in your body. . .your symptoms may disappear but the virus or bacteria remains in your body. Mucus is a good thing. . .it's your body's way of getting rid of those nasty bugs. Cold medications stop the mucus from flowing, it stops you from coughing. . .well, how do the nasty by-products of your body cleansing system as well as virus and bacteria are removed out of your system if you stop the process.
Because I was impatient, I took Zicam (Zinc nasal spray)- a homeopathic remedy while I had a cold. Wow, it stopped my runny nose and watery eyes in their tracks. I figured because it was a homeopathic remedy, what was the harm. BUT. . .a week or so later, I now have an upper respiratory infection meaning I have a chest cold. I really believe it was because I took the Zicam. If I would have just let things go and tolerate a few more days of runny nose and watery eyes, I would not be in the predicament I am now. Now, I'm left with a nasty cough, coughing up phlegm, and feeling down right terrible.
Just a little note on Zicam and Cold Eeze. It worked wonders but I read there's an ongoing law suit with people claiming that they lost their sense of smell and taste. At this time, there's no study that this adverse affect is true but for those who have thought of taking Zicam and Cold-Eeze. . .be cautious and read more on the product before taking it. The FDA is currently examining the claims.
Anyway, what is all my yapping about. . .well, during the weekend I felt terrible and that explains why I did not post any cards on this blog site and my Stampin' Inspirations bog site. I feel a little better today so I was able to make a few cards. Hopefully, my nasty cough will soon disappear.
Until later. . .
Daily Special - Technique Day - Creating A Bow
One of my readers emailed me asking how I create my bows. Considering the simplicity of a bow, how many ways can you create one. Well surprisingly, there's many way to create one.
Click Here on the tutorial on the different ways to create a bow on your card.
The current tutorial shows 4 different ways but there are actually more. I'll update the tutorial with more techniques when I have the time.
Until later. . .
Click Here on the tutorial on the different ways to create a bow on your card.
The current tutorial shows 4 different ways but there are actually more. I'll update the tutorial with more techniques when I have the time.
Until later. . .
Featured Blogger of the Week
One of my readers asked what happened to my "Featured Blogger of the Week" section. My "Featured Blogger of the Week" moved to my sidebard. It used to be at the top of my blog site but it was just taking to much space at the top so I moved it to my sidebar.
My "Featured Blogger of the Week" is Pam's Blog Site Stamping with {Serendipity}. Pam has lovely card creations and she also blogs regularly. Check out her blog site for great card ideas!
My "Featured Blogger of the Week" is Pam's Blog Site Stamping with {Serendipity}. Pam has lovely card creations and she also blogs regularly. Check out her blog site for great card ideas!
Blog Candy at Continuing to Create
I hope I'm not too late but Leslie has a blog candy too! Please visit her blog site at Continuing to Create. Drawing is today!!
Sunday, March 11, 2007
Update - Feedbitz Is Now Working
Looks like Feedbitz had a few problems accepting subscriptions yesterday. It appears Feedbitz is now working. If you attempted to subscribe yesterday and could not, just letting you know, that if you want to subscribe to my blog you are now able to.
Thank you!!
Thank you!!
Saturday, March 10, 2007
Random Card - Dysthemia and Depression
 Did anyone watch the View yesterday? It was a one hour show covering the topic of depression. It was a good show. Why am I asking? I think depression is an important topic that should be discussed.
 Well, I think from my teens off and on through my adult years, I think I suffered a mild form of "Dysthemia". I've never been diagnosed but after analyzing my life, I believe I've suffered this disorder a few times.
What is Dysthemia? Dysthemia is chronic mild depression. You know, sort of feeling melancholy, moody, the blues. . .
The DSM-IV (Diagnostic and Statistical Manual of Mental Disorders, 4th edition) is what psychologist or psychiatrist use to determine if a person meets a diagnostic criteria of a particular mental disorder.
The DSM-IV of Dysthemia is as follows:
"Depressed mood for most of the day, for more days than not, and ongoing for at least two years. During this time, there must be two or more of the following symptoms: under– or over eating, sleep difficulties, fatigue, low self-esteem, difficulty with concentration or decision making, and feelings of hopelessness. There can also not be a diagnosis of Major Depression for the first two years of the disorder, and has never been a manic or hypo-manic episode".
Basically. . .if you've had major depression - you were NOT dysthemic. Major depression is not dysthemia. There's a distinction between the two. A person with dythemia sort of feels "blah" but functions normally. They are able to work, participate in life like any normal person, looks happy, acts happy, and many may not see the person as even being close to being depressed or unhappy. It's almost an internal thing that is very hard for others to see or even understand.
I believe in my teens and a few years ago, I suffered Dysthemia. I'm not suffering it anymore. I don't know how it started. . .I'm sure there was a trigger. I think it started after a few years as an RN. After seeing people suffering cancer (I worked in an OB/GYN Oncology Unit - High Risk Pregnancy), I think I started to see my own mortality and began to worry about possibly getting cancer. I started to check my neck for swollen lymph nodes that became a routine for me. My grandmother who raised me passed away during that period and I think just a series of event triggered feelings of uncertainty.
Anyway to make a long story short. . .I never felt depressed, just "blah" and very unmotivated and couldn't find "real" happiness or joy in anything I did. . .well, that's not true, I would find joy and happiness in an event but it was so temporary and I constantly sought change or something new to do. . . each new event would bring fleeting happiness and I needed them like a fix.
What does this have to do with rubber stamping? Well. . .because rubber stamping is so versatile and the possibilities of what you can create is endless. . .rubber stamping fulfilled to some degree a void whenever I become restless, bored and needed something to occupy my mind.
When I create things. . .my focus is only what I am doing. Nothing bothers me. It's like therapy or something. If I'm upset or unhappy about something - I would make something and for that moment I forget what ever it is that is bothering me. I literally forget about it and after I'm done with a project, I usually forgot what it was I was upset about.
I know what I'm talking about is a bit personal but I think if someone is suffering from the "blahs" and it's been ongoing for a long period of time, you may want to seek treatment. I didn't seek treatment at the time it occurred and luckily, I no longer feel that way. . .I'm not sure how it went away but I sort of snapped out of it. I guess I found a natural form of therapy. . .rubber stamping! Ha! I know it sounds ridiculous but really, I feel it helped me and now, I do it because it's FUN, FUN, FUN!
Okay, now to the card I made. I used the Fiskar scallop template to create the scalloped design. I then dressed it up but adding dots with a white gel pen. To add a little dimension to the sentiment I punched a circle with a 1 inch punch and matted it on to a paper daisy.
The stamped image was colored using the "Prismacolor Pencil and Gamsol" technique which I've covered on numerous post. Check my sidebar under categories for posts pertaining to this technique.
here is the sketch challenge:

Until later. . .
Random Card - Enhance Your Card Design With Tools

There are a few elements to the card that I want to point out. When I create my cards, I like to use different tools to "dress" up the card a little. I embossed the scrapbook paper background with the Cuttlebug folder to give the paper a bit of texture. I then took a sponge and inked it and dabbed the embossed parts to allow the embossed areas to stand out a bit. Otherwise, the embossed areas get sort of lost into the scrapbook pattern and you can't see it.
To create a 3D effect on the flower, I rubber stamped the image twice and colored in one of them and cut out the flower and the leaves. I then remounted them on to the other stamped image using foam tape to give them a 3D effect. I then outlined the flower using Sakura "Souffle" 3D Opaque pen. You can't really tell by the picture but the flowers and leaves are raised up and very 3D.
Punches such as circle, oval, and label punches are great additions to embellish a card. In this case I used Stampin' Up Round Tab Punch.
I know doing these little things are time consuming but I think the end results are worth it. Unfortunately, many people don't have the time to sit and make more complex cards. I'm lucky that I do. . .
Car detail:
Stamp: CTMH Awesome Spring Blossoms, Stampin' Up Everyday Flexible Phrases
Paper: DCWV scrapbook paper, Stampin Up Positively Pink, Bravo Burgundy, Old Olive
Ink: Positively Pink mixed with Lumiere and water, Sakura 3D Opaque pen, Metal star charm, silver metallic cord
Accessories: Cuttlebug Embossing Folder, Metal Charm, Silver Metallic Cord, Stampin Up Round Tab Punch
Click Here for the product reveiw on the Sakura Souffle 3D Opaque pen that I did a few days ago. I'm beginning to really love this pen.
Here is the sketch challenge for this card

Until later
Friday, March 09, 2007
Subscriber Only Blog Candy

I now have a 120 subscribers to my Stampin Inspirations and Card Inspired blog sites. Wow, I'm honored. When I started my blog sites, I didn't think that anyone would even read them. Really!! I created them mainly because I thought it would be fun to create a blog. I started initially with my "Reflections and Perspective" blog site just for fun. I wanted to post my thoughts on various subject areas.
I decided to create a blog for rubber stamping because well, I love rubber stamping so why not. It was just something to do but it has grown into something that I really enjoy doing. It motivates me to create things and I have so much fun doing it.
When I first created my blog sites, I was unaware of the amount of other rubber stamping blogs out there. I'm shocked that there are so many. I'm lucky to even have the amount of readers that I do have because there are so many talented stampers out there who have great blog sites. . .who am I? Just another stamper blogging my work.
I would like to thank everyone who visits and/or who subscribes to my blog sites. This blog candy are for those who are subscribers of either my Stampin' Inspirations and/or Card Inspired blog sites. If you want to participate in the blog candy and is not yet a subscriber, all you need to do is subscribe.
To subscribe all you need to do is sign up at the top right of my blog's sidebar, add your email address and feedbitz will email you to let you know that you need to confirm your subscription. Annoymous subcribers will not be included in the drawing because there is no way for me to know who you are and how to contact you so when subcribing don't subcribe as "annoymous".
I will add extra candies for those who subscribed to both blog sites. For those subcribed to only one of them, you will receive the Stampin Up "Happy Harmony" stamp set and the JoAnn essential metal embellishments.
I will announce the winner on Friday, March 16th. . .this is one week from today. If you have a blog site yourself, I would appreciate you let your readers know about my blog candy or if you know of someone who loves to rubber stamp, please forward my blog site address so that they may participate as well.
If you already have the "Happy Harmony" set and want to substitute it for another Stampin' Up sell-a-bration set, just let me know which one you want.
Again, I would like to thank you all for being very kind with your comments and making my blogging experience a very fulfilling one!
Feedbitz has your email address on file so I will be informing the winner via email! I will not be posting the winner's email address on my blog. Announcement of the winner on my blog sites will only be just to inform that I had sent an email to the winner.
Until later. . .
Daily Special - Anything But Cards - Altered Cans

I cooked spaghetti the other night and saved the stewed tomato and mushroom cans and created containers for my q-tips and brushes. Forget buying containers . . .make it yourself with something that would typically be thrown away. It sure saves a lot of money and it's a lot prettier than a plastic container.
To create these altered cans/container. . .it's preferable that you use the type of can opener that cuts the lid from the outside as opposed to the ones that cut on the inside. The cut is cleaner and you can recycle the lid so if you wanted a cover for the container, you are able to alter it as well. In this case I did not keep the lids.
Quick Instructions:
Measure the height of your can.
Cut a decorated cardstock (rubber stamped) or scrapbook paper using your measurement.
Glue on to the can. You may apply decoupage to the scrapbook paper to protect it from the elements but it is optional.
Decorate as desired.
That's it. Simple and economical.
I kept my altered cans simple because I really liked the design of the scrapbook paper and didn't want to cover it up. I did not decoupage the cans that I made because I really didn't need them protected from the elements but in most cases, it's a good idea to do so. Decoupage is water resistant.
Try it out and don't forget. . .save those cans!!
Until later. . .
Thursday, March 08, 2007
Random Card - Penny Black Tulip Basket
 I love coloring images. I colored the stamped image using Prismacolor Pencils and Gamsol. Although I love coloring using this technique, detailed images can be quite tedious to color. When coloring detailed images, I like to do it while watching television to keep me from becoming bored. It may take me longer to complete but time goes by faster. Anyway, for those who missed the tutorial on the Prismacolor Pencils and Gamsol technique. . .Click Here
When I was in college, I would study while watching television. It's strange but I could concentrate better when the TV was on. I wonder if others have or had this strange study habit.
Anyway back to rubber stamping. . .this is a simple card. . .not too many blings to it. I feel that when you have a nice image, it's important to keep the card design simple so not to distract away from it. Why work so hard on coloring an image and making it pretty only to have the layout or the embellishment become the focal point?
Card detail:
Penny Black Tulip Basket, Anna Griffith sentiment
Paper: Stampin Up Baroque Burgundy, Sage Shadow, Old Olive, DCWV Designer Paper
Ink: Stazon jet black, Baroque Burgundy, Prismacolor Pencil with Gamsol
Accessories: 1 inch circle punch, silver metal cord, organdy ribbon

Wednesday, March 07, 2007
Update on yesterday's post - Hanging Envelope Organizer
This post is for my subcribers. Because updates on previous posts are not sent to subscribers, I'm just letting y'all know that I updated yesterday's post on the "Hanging Envelope Organizer" and added a tutorial. Please visit my blog site and refer to the previous post to be linked to the tutorial.
Until later. . .
Until later. . .
Tuesday, March 06, 2007
Daily Special - Anything But Cards - Hanging Envelope Organizer


**UPDATE - Click Here for the Tutorial**
I had bought a box of those large greeting card envelopes a long, long time ago. I, initially planned to make cards for those envelopes but found that they were too big. Yuck. It's been sitting in a box and I did not know what to do with it. I learned a technique a long time ago in which envelopes were glued together in a series to create an envelope book.
Well, I took the concept and created this organizer instead. The first picture shows the project without anything inserted inside the pockets and the second pictures shows the pockets with the contents inside.
The back of the organizer is an 7 x 11" chipboard and the envelopes or pockets are approximately 3 x 6 inches. You may also use a poster board and cut it up to create a larger organizer or a series of organizers attached to the poster board.
I'll make another one and do a tutorial on this project. If I have the time, I'll post it tomorrow.
Until later. . .
Monday, March 05, 2007
Daily Special - Anything But Cards - Chipboard Coaster Tag Pocket
 Today's Daily Special is Anything But Cards - Chipboard Coaster Tag Pocket. I made this for a "chipboard" swap that I had joined. I wanted to make something different and a little more on the elegant side as opposed to my typical cutie projects.
How did I make this tag holder? Here's how:
Material
Two 4x4" chipboard coasters
Designer Paper (Cut two 4x4")
Decoupage
Large scallop tag (you can make your own tag to fit the pocket
Coordinating colored cardstock 4 x 8 1/4"
Ribbons
Hole Puncher or paper piercer
Embellishments
Stamps
Sanding Block
Ink pad
Instructions:
- Glue the designer papers on to one side of each of the coasters using the decoupage
- Sand the edge using the sanding block
- Distress the edge with the desired ink
- Decoupage the top of the designer papers
- Glue the coasters side by side on to the 4 x 8 1/4" cardstock with the designer paper facing up
- Fold the cardstock in half with the designer paper facing out. This will create a pocket for the tag
- Punch 4 holes on both coasters on the left and right side. Due to the thickness of the coasters, you may need to use a paper piercer to punch the holes.
- Thread the ribbon through the front to the back side of each coaster, cut and tie the ribbon. Do this for each hole on both left and right side of the tag holder
- Design your large tag as desired
- Insert the tag into the coaster tag pocket
That's it! Below is how the tag looks outside of the tag pocket. Try it out! It's quite fun to make!

Until later. . .
Sunday, March 04, 2007
Daily Special - Anything But Cards - Coaster Hanging Plaques

Today's Daily Special is Anything But Cards. I made these plaques that can be hung up - similar to an ornament. This would be a great project for Christmas ornaments. I made the plaques using 4 1/2 inch coasters.
I covered the coasters using scrapbook paper and decoupage to adhere to the coasters and as a protective layer on top of the paper. I then decorated on top of the paper after the decoupage dried. I used decoupage instead of modge podge because I read that decoupage is water resistant.
I then punched a hole at the top and attached a ribbon. It was a challenge to create a hole because of the thickness of the coasters - a hole puncher could not penetrate through the coasters so I had to use a paper piercer.
I created these coasters for a "chipboard" swap.


I used CD envelopes as envelopes for the coasters. It can be mailed out this way with the window showing the coaster and the backside to write your address and adhere the stamp.
I used glue dot to hold up the coaster so it is centered in the window.

Try it out! It was fun making these plaques. . .just another way to use coasters.
Just a little commentary. . .
It's funny because I noticed that I have more visitors on my Stampin' Inspirations blog site than I do this one - actually double the amount. I blog more on this blog site because my other blog site is focused only on Stampin' Up products and there's a few limitations.
This blog site gives me more freedom to experiment with other products on the market. I do more tutorials, use more embellishments, and different papers on projects that I create for this blog site.
By virtue of the product used (Stampin' Up) to create projects , my other blog site has more readers and I think that's a little funny considering I do more projects on this blog site.
Sometimes I wonder if it would be easier if I abandon this blog site and focus more on the other blog site. It's something I have to think about but I do enjoy making projects using other products. I don't like to limit myself to one product because honestly, there are lots of other products from other companies that are absolutely awesome and I would be limiting my creativity if I stuck to using only one brand.
Just my thoughts. . . until later. . . .
Saturday, March 03, 2007
Check Out My Search Engine
Yes, you can now search my two blog sites and my website for specific projects, tutorials, techniques, etc. The search engine is located to the right of my blog site right below my picture. It only searches my three site (Card Inspired, Stampin Inspirations blog site and website). I'm so thrilled that you can now search my blog sites and website without having to scroll down my archive. Try it out! Please do. . .and tell me what you think!!
Random Card - Fiskars Clear Stamps - Girlfriend
 The stamps that I used to create this card was from the Fiskars clear stamp "Girlfriends" set. I like this set because I've been looking for stamps that I could create cards specifically for my girlfriends. I love drinking coffee, especially Starbuck's Caramel Frappuccino and this card is so fitting to send to myself. Ha!
I'm not sure if you've noticed by I have a tendency to use bright spring colors when creating cards and I really wanted to step away from it and do something different.
I'm not sure if I like the color combo but maybe it's t because it's not the bright and happy colors that I am accustomed to using.
See the previous post on my review of the Fiskars Clear Stamps.
Friday, March 02, 2007
Product Review - Fiskars Clear Stamps
 My product review is on Fiskars Clear Stamps which cost $12.99 at regular price at JoAnn. JoAnn had a 40% sale on all their papercrafting products including their rubber stamps and like a good shopper, I bought 4 of them as well as the large acrylic block. At 40% off, a set of stamps, which by the way has a lot of stamps, came out to approximately $7.00. In opinion this was an awesome deal.
I love the stamp designs. . .they were very cute and each set contains at least 2 background stamps and left and right side images of the same image, and at least 5 or 6 sentiments. Some of the sets contained at least 10 sentiments in various sizes.
The set also comes with multiple stamps of the same images. The purpose for this is the large acrylic block (sold seperately) is like a template in which you can place the stamps with a particular design in mind and rubber stamp multiple cards with the design template you created. I think this is such a wonderful concept. It's like a printing press.
Here are a few advantages other than what was already described:
- Storage. It takes a very little amount of space to store these unmounted clear stamps. Imagine being able to store a 100 stamps on one shelf. The image is printed on the plastic mat so you can easily put the stamp back on to the mat exactly as it was before you removed it.
- When stamping with clear stamps and clear acrylic blocks stamping is a breeze because you are able to see through the block while stamping and see exactly the placement of the image on your card.
- Removing and placing the stamp on to the acrylic block can be a hassle. I'm very impatient so doing this extra step is just that. . . an extra step.
- I found that like with any clear rubber stamps, inking of the stamp can be blotchy I believe because of the type of rubber that clear stamps are made of. The ink tends to bead, therefore, if you don't ink the clear stamp really well, the stamped image can appear fuzzy and blurry looking.
- The clear stamp is also thin and a bit soft so if you apply too much pressure when stamping, this smooshes the stamp and this is what also contributes to the fuzzy appearance of the image.
There are advantages and disadvantages but overall, for the price I think it's worth it. The previous card I posted and one of the boxes I created (posted the other day) were created using the clear stamps and I think they turned out pretty good.
I will buy more of them in the future. . .ummmmm, but only when they are on sale or if I have a JoAnn's coupon. Anyway, I never buy anything at JoAnn unless I have a coupon or it's on sale.
Until later. . .
Random Card - Poppin Pastels - Fiskars Clear Stamps
 All the stamps used for this card was created using clear stamps and acrylics. I was suppose to do a review on Fiskars clear stamps yesterday but I forgot to do it. Check back on my next post for the review.
I created the background by stamping one image with two different colors - Stampin Up Cool Caribbean and Cranberry Crisp. I then took a sponge and dabbed the image with it's coordinating colors to give the background a bit of color.
The main flower image was from a JoAnn's $1 clear stamp. I think it's such a great image for a $1 stamp. I bought 9 of them and all of them are very pretty. The image was colored by using the "Poppin Pastels" technique. Click Here for the tutorial. It's an easy way to create multi-colored images.
Card Detail:
Stamp: Fiskars "Thank You" clear stamps, Autumn Leaves "Flower Trio" clear stamp (JoAnns's $1 stamps)
Paper: Stampin Up Whisper White, Cranberry Crisp, Cool Caribbean
Ink: Stampin Up Cranberry Crisp, Cool Caribbean, pastels, VersamarkAccessories: Dots, Checks, and Stripes ribbon
Technique: Poppin Pastels
Anyway, when you have the time, try this sketch challenge out! Remember . . .have fun stamping!

Until later. . .
Thursday, March 01, 2007
Featured Blogger of the Week
The featured blogger of the week is "Craft Critique". This is a blog site focused on reviewing the various craft products out on the market today. Reviews are collectively gathered from other bloggers and crafters who have actually bought the products and used them. Each month they feature a "carnival" of a particular type of product. February's carnival review was on paper trimmers and this month's carnival will be on paper punches.
This is a great site especially if you are interested in purchasing products that you have been hesitant to purchase because you were unsure if it was worth the purchase or unsure of it's use.
Check it out today. . .I believe you'll be impressed with this site.
Until later. . .
This is a great site especially if you are interested in purchasing products that you have been hesitant to purchase because you were unsure if it was worth the purchase or unsure of it's use.
Check it out today. . .I believe you'll be impressed with this site.
Until later. . .
Daily Special - Anything But Cards - Boxes & Baggies 2
 Here are boxes I created using the same template as the boxes I created shown on my previous post. Scroll to my previous post to view those boxes and the link to the template.
Unlike the other boxes I had created, these boxes/baggies were created using scrapbook paper rather than cardstock. I then added embellishments, punches flowers, ribbons, and tags to decorate the box.
These boxes are really fun and easy to create. From time to time, I like to create projects other than cards just to keep myself from being bored. It's fun to do something new once in a while. Create a few boxes for no reason, store them, and pull them out and give them away when you would like to thank someone or just because.
I'm feeling so much better. . .I no longer have a runny nose or tearing and I am so happy that I am almost back to normal. I'm excited to be able to make my cards and projects which I was unable to do for the past week.
Until later. . .
Daily Special - Anything But Cards - Boxes & Baggies

Today's Daily Special is "Anything but Cards". I made a few boxes or baggies using a template. Click Here for the box template.
These boxes are similar to the Valentines box that I created on my Stampin Inspirations blog site a few weeks ago. The difference is I used a template for these boxes and the ones I created on my other blog site was made from scratch.
I rubber stamped the images all over and added a sentiment and tag to top the card off. It took me about 10 - 15 minutes to create each box so it's easy to make a whole bunch of them without a problem.
The first box with the hearts was rubber stamped with Fiskar clear rubber stamps which I will be doing a product review some time today. Check back later this afternoon.
Until later. . .