This blog site focuses on cards and projects utilizing materials and tools from various scrapbooking and paper craft companies.
If you are interested in cards and projects made with rubber stamps from various companies, please check out my other blog site "Stampin' Inspirations".


Come and join the Christmas Group Site on Paper Craft Planet
Click on the banner below


Wednesday, February 07, 2007

Ahhhh. . .Clean Space Again

Yes, my area is clean again. It won't be for long but it just feels good to have a clean workspace, even for just a day.

I have another desk right next to my main works station but I rarely work on it. I have my die cut machine and sewing maching on that desk.

My desk was purchased through Best Craft Organizer. Click here for their website.

Check out their desk and organizers. The drawers are 1" and 2" drawers to fit rubber stamps and tools. I absolutely love them!! I also have an additional stackable organizer similar to my desk that has slots for 12 x 12 scrapbook papers and additional drawers for rubber stamps and accessories.

Check out the website! I feel they have the best desk and organizers mainly because their products are made specifically for rubber stampers.

Until later. . .

Random Cards - Get Well Cards

I made these get well cards last night before I went to bed. Just a few quickie cards. . .well, the layout was a quickie, the coloring wasn't. I actually colored the bears while watching television earlier in the week and had set them aside for future use. I color images while doing other activities like watching TV or listening to music, set them aside, and when I have the time put them together.

Card Detail:

Stamp: CTMH Patch, Hero Arts sentiment
Paper: Stampin Up Pretty in Pink, Positively Pink, Close to Cocoa, DCWV scrapbook paper
Ink: Stazon jet black, color pencils, Stampin Up Positively Pink
Accessories: Organdy ribbon, Marvy tag punch, Scalloped scissors, eyelets, gold metallic cord


Card Detail:

Stamp: Same as above
Paper: Stampin Up Tempting Turquoise, Whisper White, Chocolate Chip, DCWV scrapbook paper
Ink: Stazon Jet Black, Colored Pencils
Accessories: Organdy ribbon, Scalloped Scissors, Star charm


Tuesday, February 06, 2007

House Mouse Cards

I made a few cards with House Mouse Stamps. . .the House Mouse designs are one of my favorite stamps. For those of you who are unfamiliar with this stamp series, the quality of the stamped images are one of the most detailed and excellent quality image that I've found so far.

It's not just a simple doodle stamp but it is a work of art. As I've said before in other posts, because of the detailed art work, coloring these little critters can be time consuming but so worth the time when you see the quality of the finished product.


Card detail:


Stamp: Stampabilities Lavender Dreams, Anna Griffith sentiment stamp
Paper: Serendipity Caramel, Stampin Up Pretty in Pink, White Glossy Cardstock, Provocraft Scrapbook Paper
Ink: Stazon jet black, Stampin Up Pastels
Accessories: Stampin Up 1 inch circle punch, Silver brad, Making Memories designer ribbon, Stickles


This next card I enhanced the flowers with Stampin Up Crystal effects to give it a 3D shiny appearance. You can't see it in the picture but it really enhances the appearance of the flowers. I don't apply the Crystal Effect on the whole flowers, just the outline. . .it also gives the flowers a unique texture. You should give it a try sometime. I used crystal effects on my card on the previous post as well. You can see the effect better on that card.


Stamp: Stampabilities Special Delivery, Hero Arts Sentiment stamp

Paper: Serendipity eggplant cardstock, Stampin Up Orchid Opulance, White GlossyCardstock

Ink: Stazon Jet Black, Stampin Up markers and pastels

Accessories: Making Memories ribbons, Marvy tag punch, hemp cord, scalloped scissors, Stampin Up Crystal Effects


Until later. . .

Penny Black Hedgehog - Stampin Up Crystal Effects

I made a few cards today. . .I'm so proud of myself!! I've been sort of slow on making cards the last few days because I lacked motivation and I've been so busy doing other things. So. . .to make a few cards really makes me feel I'm back to my old self.

I don't know if you can see it but the apples on this card is shiny. To create this shiny effect, I used Stampin' Up Crystal Effects. It's pretty much a glue that dries clear and give your images a dimensional or raised shiny appearnce to enhance your stamped images. I love using this medium to dress up my cards. Other brands that carry a similar dimensional glue is Inkidinkado "Glossy Accents", Aileene's "Paper Gloss", and Judikin's "Dazzling Diamonds".

Card details:

Stamp: Penny Black Bushel of Smiles, Anna Griffith sentiment stamp
Paper: Stampin Up Green Galore, Positively Pink, White Glossy Cardstock, DCWV Scrapbook Paper
Ink: Stazon jet black, Stampin Up Markers and Pastels
Accessories: Swirl Clip, Making Memories Ribbon

Daily Special - Anything But Cards - Card/Memo Folder

Check out the tutorial on my Stampin Inspirations blog site. The tutorial is on a "Card/Memo Folder".

Click here to be linked to the my Stampin Up Inspirations blog site or click on the title of this post.

I'll make another Card/memo folder and upload a picture on to this site.

Until later. . .

Monday, February 05, 2007

Featured Blogger of the Week

I have a new "Featured Blogger of the Week"! I chose "Stamping 101" to be featured this week. Although it appears that her blog site is fairly new, she already has a bunch of great tutorials. I'm originally from Hawaii and it was great to see the Aloha flip-flop card that she made. To check out her blog site, click here . . .or click on the title of this post to be linked to her site.

I am retiring Inkventive Expressions to my sidebar but don't despair, if you haven't already added her site to your favorites, the link to her blog site will be located to the right of my blog site under the heading "Featured Blogger" and you can visit her site at any time!!

Until later. . .

Response to My "Tell Me About Yourself" Questionnaire

Because my questionnaire was so long, I'll post a few of the responses I received each day until I cover them all. It was reaaaaaaaaaaaaaally fun reading your responses and I want to thank you for taking the time to fill out my questionnaire.

For the first question "How long have you been rubber stamping?"

The majority responded 1 to 4 years. I'll be making 4 years this year so I had this in common with my respondents. The average was 2 to 3 years. BUT. . .approximately 30% have been stamping for over 5 years and 5 of the 49 respondents have been rubber stamping for over 10 years and Linda Y. has been rubber stamping for 15 years. I never heard of rubber stamping up until 5 years ago. . .imagine, someone rubber stamping for 15 years! Linda Y. . .you should create a blog site and share your vast rubber stamping experience with all of us!!

There were a few newbies <1 year - approximately 7 of the 49 respondents have been rubber stamping for less than a year. Shelly, Emily, Rochelle, and Kris are super newbies. . .they just started stamping! Welcome to the world of rubber stamping!!! I hope you stick it out and continue to learn!

The second question was "How often do you rubber stamp or make cards?"

An overwhelming majority responded with either daily or several times a week. There were about 5 of you that rubber stamped occasionally like once a month or once a week. Wow, it's really great to hear that I'm not the only one that rubber stamps daily or several times a week. Honestly, I thought I was a minority and that most rubber stampers rubber stamped a few times a month. I thought I was spending too much time with this hobby and I've been rest assured that I'm no different from many rubber stampers out there!

Trish rubber stamps daily and said "A day without stamping is a day without sunshine". Hahaha! I like that!

Okay. . .that's the two questions and responses for the day. I'll do two more tomorrow~

Until later. . .

Sunday, February 04, 2007

Daily Special - Technique Day - Coloring With Pencils

I'll do a Daily Special today and it's "Technique Day" - Coloring with pencils. I used a very cheap pencil that I recently bought at Michael's. This set of 24 was only $12.99. Prisma color pencils are $48 I believe for a set of 24 so a $12.99 set is considered very cheap. These pencils are made by Koh-I-Noor. This set of pencils are softer than other lead pencils so it was easier to blend with them. It didn't take as much work to blend as the harder lead pencils.


Here is a basic tutorial on coloring:

I used a regular matte cardstock to stamp my image.


First step: Outline your image. Save the detailed parts of the image for last.

Step 2: In a circular motion, from the outline inwards, color in the image using a small amount of pressure. Don't color in a straight up and down motion, circular strokes are best. Don't worry if your coloring don't look that pretty. This is just the base.

As you can see I left the centered areas uncolored. These areas will be the highlighted areas. Imagine where your light source and where you would think the light would shine on your image. . .it could be to the left side, right, or middle - whichever side, be consistent.

In my example below, my light source (in my mind - not literally) is slightly above and centered on the image, therefore the highlights will be at the center. Does it make sense?

For vases and jars, you may initially want to color in a horizontal motion following the curvature of the vase or jar then start to use a circular motion as you color inwards. The same applies with folds such as clothing.

You need to use a little bit of your imagination. Just think where shadows would appear. . .under a fold, under the chair. . .color those areas darker than areas exposed to light, again in a circular motion.


When coloring hair, color the outline and slightly outside of the outline but don't color the whole head of hair. It's even okay to leave some parts of the hair uncolored - just fade out your coloring as you head towards the center. Hair at the top of the head is usually lighter than the bottom so color those areas accordingly.
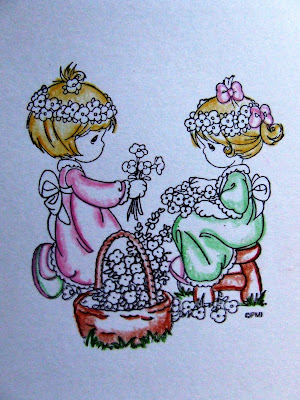


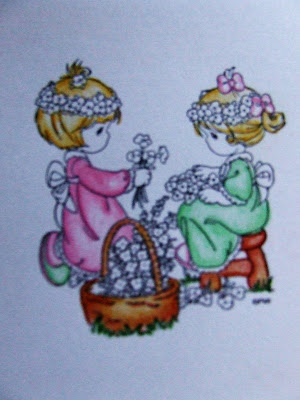
Step 3: Sorry but the picture is blurry. Now, with lighter pressured circular motion, continue to color inwards from the originally shaded areas. Color the shaded areas as well, blending the colors in, but while you're coloring inwards from your outline towards the center, place less pressure on your coloring strokes. The lightest strokes are reserved for the center . . .barely color in as you head towards the center.


Last step: Color in the detailed parts of your image. For flowers, color the center and under the flowers darker than the outer parts of the petals (in real life, the outer parts of the petals are exposed to the sun, therefore would be lighter than the inner portions of the flower). The same applies to leaves, as well as ribbons.
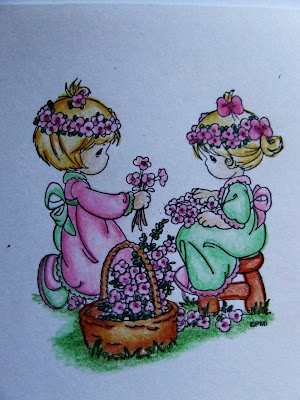


The key to coloring is your strokes and ability to add shading and highlights. Apply more pressure to your coloring for shaded areas, lighter pressure in highlighted areas. Always use circular motion to color and blend the colors in very well.


I used two types of brown for the basket and the stool. One lighter and the other a darker shade. I mixed and overlapped the lighter color with the darker color to prevent an obvious demarcation between the two colors.


Practice, practice, practice. . .it takes a while to get good at it but once you are able to control the amount of pressure applied to your coloring strokes, you'll get the results that you want.

<<>


That's it. Hope this tutorial helps a bit with coloring.

Until later. . .