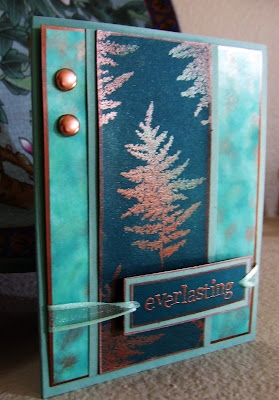
Random Card - Polished Stone - Pearl Ex
I made these two cards for a swap which by the way I'm far behind on. I'm behind on a lot of things including the laundry. We're leaving for Washington D.C. on Monday and there's so many things I need to do before we leave but awhhhh. . .I'm just so not in the mood to do anything right now. Call me a procrastinator. . .
I've never been to Washington D.C. - I can't wait to see the White House and everything else that is Washington. Because it's Spring Break, my kids and I are going to accompany my husband on his business trip to Virginia then we'll head to Washington D.C.
Anyway, back to the cards. The background was created using the Polished Stone technique. . .I used Stampin Up Hunter Green and Gable Green mixed with Adirondack Mixative in Copper.
Click Here for my tutorial of the Polished Stone Technique.
The tutorial is on a previous post not on a web page. When clicking on the link, don't be surprised to be linked to a blog post. Just scroll down to view the tutorial.
In the past, I did my tutorials directly on to my post but I found it to be too tedious and extemely slow process so I now create my tutorials on to a web page. It's so much easier and faster to create my tutorials on a regular web page.
Back to the card creation. . .to create the primary image, I used copper Pearl Ex with a mix of green. For those who've never worked with Pearl Ex. . .there's nothin' to it. Here's a quick instruction:
- Ink your stamp with Versamark
- Stamp the image on to a darker colored cardstock
- With a medium size brush, pick up a little bit of one color of Pearl Ex. In this case, I used Copper. Tap the brush and allow the Pearl Ex fall on to the stamped image.
- With your brush, brush the Pearl Ex on to desired areas of the image
- When done, with your brush, pick up another color. In this case, I used a Green colored Pearl Ex.
- Tap the brush and allow the Pearl Ex to fall on desired areas.
- Brush the second color of Pearl Ex on to desired areas including over the first color. This allows the color to mix a little.
- Spray your image with a fixative or hair spray.
That's it. Simple, huh? Well, I love the effect. It gives the image a very beautiful shimmery effect.
To finish off the primary image, I outlined the edge with copper metalic ink.
The sentiment was heat embossed with copper embossing powder and outlined the edge with the copper metallic pen.

The second card below was created in the same manner as the first card but with a different layout.


Until later. . .


No comments:
Post a Comment