This blog site focuses on cards and projects utilizing materials and tools from various scrapbooking and paper craft companies.
If you are interested in cards and projects made with rubber stamps from various companies, please check out my other blog site "Stampin' Inspirations".


Come and join the Christmas Group Site on Paper Craft Planet
Click on the banner below


Showing posts with label Christmas Cards. Show all posts

Monday, January 26, 2009

Announcement!! Christmas Group Blog Debut

Come and join the group site on Paper Craft Planet
Click on the banner below or here


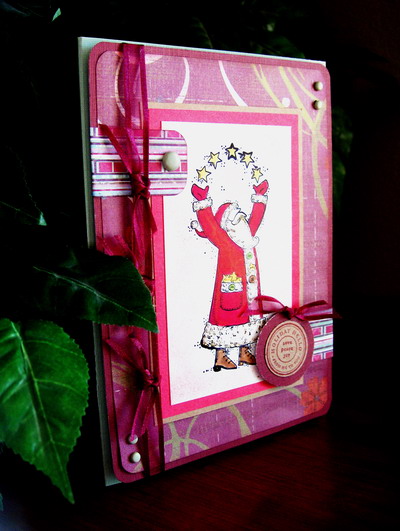
Hello, Friends!! I have a big announcement to make! I started a group blog called "Chistmas Stampin' All Year Long". Stop by and I would love, love, love to have you play along. This week's challenge is a sketch challenge and the card above is my sample. Check out the other blog member's samples. . .all their cards are "inspirational"!!

Were you behind on you Christmas cards and handmade gifts last year? Did you feel overwhelmed during the holidays trying to catch up on creating your cards? Did you fail in sending your Christmas cards on time or not send any at all?

Well, this challenge blog is the place for you to get motivated to start NOW!!! Each week, I'll post a challenge (sketch, color combo and others) each and the group members will show samples of their cards on the group blog.

You can participate by creating a card based on the challenge and commenting on the post with the link to your picture from your blog, SCS photo, PCP photo, or online album. You may also send the photo to my email address cardinspired@gmail.com

I will upload your card photo on to an album on Paper Craft Planet so everyone can see your lovely work. This blog site is primarily a motivational site but from time to time, I may do a contest . . .maybe once a month and I'll have the group members vote on which card they liked best.

Anyway. . .stop by the group blog today and check out are first challenge and the samples!! I hope this challenge blog will help you to get motivated to create your Christmas cards.

Christmas Stampin All Yearl Long has 9 blog members so far! Whoohoo.
The group members are:


Friday, November 21, 2008

Noel Card

Hi Everyone!! Wow, it's been almost a week since I last posted on this site. I've been busy working on a few rubber stamping projects on my other blogs so i didn't have the time to create any scrappy projects but I decided to allot some time to create something for this blog!!


Hey. . .I've been a really good girl!! I haven't bought any designer paper for almost a month! No way! Yup!! I also haven't bought any new embellishment. Actually this chipboard images and alphabet was the last item I bought. It's a package of DCWV Chritmas chipboards.

I've noticed that I've been primarily making 5.5x5.5" square cards lately. It's because there's a larger area to add more things. Sometimes it's hard to fit embellishments like alphas and large images on a 4.25 x 5.5" card.


Do you see the silver cord? Well I wanted to create something different so I tied bows on the cord. . .they sorta look like flowers. I like it because it's something I've never done before.

Anyway. .. if I don't post on this blog. . .it's usually because I have obligations for my two other blogs like my stamp club and my design team obligations but I'll make an effort to squeeze in some time to make some scrappy projects!!


Hope y'all have a fabulous weekend!!

Card Details:

Papers: My Minds Eye designer paper, SU Baroque Burgundy, Speckled White cardstock
Accessories: Fiskar Cloud Scissors, DCWV Christmas chipboards, Organdy ribbon, Silver cord

Tuesday, November 11, 2008

Quicky Christmas Card


Hi Everyone! Happy Veterans Day! Just a quick post for today. I made this card a few days ago. Just a simple card. . .my attempt once again to use up my Prima flowers. Gotta use them up so I can buy more. LOL!

I don't know if you notice something funny about my card but. . .I just realized the designer paper's orientation is upside down. Notice in the right top corner. . .the deer and the dove is upside down!! LOL! Don't you just hate that!

Anyway. . .nothing much to say about this card. I think the only thing I want to mention is the sentiment. . .I typed it out on my computer. It's a fast and easy way to create sentiments for your cards! Try it out. . .it's much cheaper than "buying" stickers or trying to find just the right sentiment for your cards!


Card Details:

Paper: My Minds Eye designer paper, SU Baroque Burgundy, White
Accessories: Prima flowers, White buttons, Martha Steward Border Punch, Organdy ribbon

Friday, October 24, 2008

Ornament Snowflake card


Hi Everyone! Just another ornament card that I made. I was suppose to add a cap but in my rush to finish the card, I forgot to add it.
It was fun creating this card. I used the large Sizzix die to create the large snowflake. I added a bit of Stickles to the snowflake so it can stand out more.
Initially, I was just going to create a 5.5 x 5.5" card and add the snowflake but decided to put it on the ornament shape.


I recently bought a Christmas stack of designer paper but I still have stacks from 2 years ago! Argggh! I really need to start doing somethng with these designer papers. The funny thing is some of the patterns are coming back in popularity so I guess it's a good thing to keep your old designer papers.

Anyway, I'm off to pick up my daughter from school so this post will be a short one.

Hope you all have a fabulous weekend!!

Monday, October 20, 2008

Unbelievable

Hi Everyone! What's unbelievable? Well, it took me two hours to make this simple card. Why? Well, a few months ago I had bought a Xyron sticker machine because I had a 50% JoAnns coupon and decided to buy the machine. I wasn't sure what I was going to do with it but I figured that I'll find some use for it one day.

Today, I decided to use the machine. I wanted to add glitters to the snowflake die cut and I thought, well, I'll run it through the machine to add the sticky on the snowflake and press the glitters on to it. Yay!

Well, I opened the box and the only instructions in the box stated to just run your image through the machine by rolling the knob clockwise. Okay. . .sounds simple but I was like "how do you set up the machine,?". . .I looked for the instructions and there was none. Most times you have to do something to get started.

I thought, how stupid not to have any instructions to set up the machine. So, like a dummy, I opened up the cover and started meddling with the paper and plastic sheet inside the machine.


I was becoming really FRUSTRATED trying to figure out how to thread the paper through and kept messing with the cartridge. I did it several times and it refused to run my die cut through the machine.

Then after 40 minutes of adjusting and readjusting the cartridge a light bulb went off in my head. Could it be possible that there is NO SET UP process?

Nah, that can't be, huh? But nothing else was working so I decided to put the cartridge back the way it initially was when I first opened up the box. Well that took another 15 minutes of messing with the machine. When I finally figured out how it was initially set up, I ran my die cut through and it worked! ARRRGGGHHH!! Can you believe it?

I learned a HUGE LESSON!! If there's no instructions telling you to set up the machine. . . it means NOT TO SET UP the machine. Just follow the instructions. . . "run your image through the machine" . . .that's it! I guess it sounded too simple.

Well, I finally was able to run my snowflakes through the machine and add the glitter on to them and finish up may card!! I was so exhausted, I didn't even bother to clean up the glitter around the edge of the snowflakes.

Anyway. . .nothing much to this card. I just cut a 5" circle using my EK Success circle cutter template, added the ribbon, attached the charm and snowflakes and that's it.

Okay. . .if you buy the Xyron machine, don't mess with it. . .there's no set up process.

Card Details"

Paper: DCWV Christmas stack, SU Pretty in Pink
Accessories: Sizzix snowflake die, dyed glitter, JoAnn metal charm, silver metallic cord, Making Memories ribbon


Tuesday, October 07, 2008

A Fall Christmas Card

Hi Everyone! Every heard of such a thing? "A Fall Christmas Card"? Who said Christmas cards have to be green and red or gold or silver or blue? How about browns and oranges? I was just using up some of my scrap papers and wanted to do something different.


Anyway, nothing much to the card other than laying out the designer papers and adding a few embellishments. This was a quickie card again. I love these quickie cards. Card making shouldn't have to take hours to make. My limit is 1 hour. I try not to go beyond an hour when I make cards because anythng longer than that, I start to think feel the card needs to be framed and preserved. LOL!


This is a close of the card. Do you see the sentiment? Well, it's computer generated.

Anyway, nothing much else to say about this card.

Card Details:

Papers: DCWV designer paper, SU Really Rust, More Mustard
Accessories: Fiskar Border punch, Satin ribbon, Prima Flower


Wednesday, November 28, 2007

Scrap Christmas Tree Cards


Hi Everyone! I'm sorry I haven't posted on this site for a few days now. I haven't made any scrappy projects because I've been concentrating on making cards with rubber stamps. Be sure to visit "Stampin Inspirations" for cards that I created for that blog site.
Anyway, here are two cards I made using scraps of designer paper. I wanted to try a different shape and making a Christmas tree card would be appropriate. I punched one inch circles and created ornaments. I topped them off with rhinestones.
After this week, I'll be slowing down making cards and can concentrate on scrappy projects. Right now, I just want to get my Christmas cards finished off.
Hope y'all have a wonderful day!

Sunday, November 04, 2007

Christmas Cards for Angel's Blog Candy

Good Morning Everyone! My Internet has been running so slow lately. My husband told me that it's a problem with Time Warner right now. Okay. . .it's driving me crazy. It hampers my ability to blog, to do my online banking, to comment on other's site, to download my email, to create tutorials etc. It's so funny how much we depend on the Internet.

Anyway, enough of my complaining. Here are two cards I created for Angel's (Angelosity) Blog Candy/Challenge. I believe there's only 3 more days left. It's been fun working with her sketches.

The ornament above is a sticker by Stickopotamus. I had this sticker for so long that when I tried to peel it off, it was stuck to the backing so I had to cut it out. Oh, well. You gotta do, what you gotta do. I mounted the sticker on to the cardstock with foam tape to give it a 3D appearance. You can't see it looking 3D by the picture. I then stamped the sentiment.

This card was created for sketch #17: Click here for the sketch.


The snowflake in the middle of this card is actually a small ornament that I came in a packet. You can't see it in the picture but it's actually suspended by a string which I taped to the back. I like it because there's movement with the snowflake.

Anyway, this card was created for Angel's sketch #16: Click Here for the sketch.

Angel's blog candy is winding down and I still have a few more catch up card to do. I think I'll catch up today. . .I think.

Until later folks!

Wednesday, October 24, 2007

Christmas Cards and Angel's Challenge/Blog Candy

Whoohoo! I'm on the roll with Angel's (Angelosity) Challenge/Blog Candy. It's been fun creating cards using someone else's sketches. This card is for Angel's sketch #6: Click here to see the sketch.


No stamping whatsoever with this card. Yay! The snowflake is a sticker that I mounted on cardstock then cut it out. I crimped the cardstock. . .remember when crimping was popular. I rarely see cards with crimping these days. Well, I decided to pull out my crimper and created the crimped background.

Card Details:

Stickers: Provocraft Winter Stickers
Paper: SU Bashful Blue, Ballet Blue, White
Accesories: DCWV Christmas Stack, SU Slit Punch, 1/8" circle punch (scallops), Big Lot Ribbon, JoAnn Brad

This card was created using Angel's Sketch #18: Click here for the sketch. I basically used the same material for this card as my first card. The only difference is the swirl clip and the silver metallic cord. I also added a different designer paper by DCWV.

Tuesday, October 23, 2007

Cards For Angel's Challenge/Blog Candy

Hey Everyone. I made two cards for Angel's Challenge/Blog Candy. Like I said on my previous post, Angel is giving out a huge prize so be sure to drop by her blog site and check out the challenge. If interested. . .click here for the rules. This card is day 5 sketch. Click Here for the sketch.

I made this card using my CB Leaves die again for the primary image. I did do a little bit of stamping because initially, I was going to post this card on Stampin Inspirations. When I was looking for a focal image, I decided to use the die-cut leaves as my primary focal point so this card ended up being posted here on Card Inspired.

You can't tell by the picture but the stamped background is shimmery because I applied Pearl Ex to the stamped images.

Card Details:

Stamps: SU Grand Cornucopia, Happy Fall Y'all
Paper: SU Really Rust, More Mustard, DCWV Fall Stack

Ink: Versamark, Basic Black, Glitter Gel Pen
Accessories: CB Leaves Die-cut, Grosgrain ribbon, Making Memories colored staples, Fiskar "Cloud" scissors


Here's another card I submitted for Angel of Angelosity's challenge/blog candy. Click here for the sketch. This sketch is for Day 2.


I created the card with a horizontal orientation but I did follow the sketch. Following other people's sketch is really fun. I should do it more often. Did you know that I have never followed my own sketches. . .like I've said in the past, I create my sketches after I create the card.


I think I'm going to create two cards for each post; one is to follow a past sketch that I created and follow another person's sketch from either a blog or SCS. Sounds like a plan. . .

Card Details:

Stamp: Inkadinkado
Paper: DCWV Textured Cardstock, SU Pretty in Pink, Old Olive
Ink: Old Olive
Accessories: 1" and 1 1/4" punch, Colorbok ribbons, Fiskar "scallop" scissors

Saturday, October 13, 2007

A Whole Bunch of Christmas Cards I Made Today


Good Evening, Everyone! I created these Christmas cards today. . .again, trying to get rid of my scrap pile and I'm doing a good job so far. A great way to get rid of scrap designer papers and cardstock is to punch them using a sqaure punch and creating gift boxes. Just top it off with a ribbon and whala, that's it! This is a fast and easy way to create a design for Christmas and Birthday cards! No stamping was done on this card except for the sentiment. Stamping the sentiment was faster than looking for a sticker that matched the colors of my card.


Card Details: K&CO Designer Paper, Provocraft Holiday stacks, Making Memories eyelets, 1 1/4 square punch, organdy ribbon, stitches created by sewing machine, SU Cardstock: Pretty in Pink and Old Olive, SU Old Olive ink, Inkidinkado Holiday Stamp set


I made these three blue Christmas cards because I wanted to use up my fat pile of blue cardstock and one of the scrap designer paper that's been sitting in my scrap pile. I also wanted to use up an opened pack of stickers that has been sitting in my scrap pile for 3 years. . .yup, 3 years. I have a lot of open packs of left over stickers waiting to be used.


Card Details: Stickopotamus Vellum Snowflakes Sticker, Organdy Ribbon, CB Embossing Folder, Stickles Glitter, Provocraft Holiday Stacks, SU Cardstock: Bashful Blue, Ballet Blue, Whisper White, SU Ballet Blue ink


Card Details: Stickopotamus Vellum Stickers Snowflakes, CB Embossing Folder, SU Bashful Blue, Bordering Blue, Ballet Blue, Whisper White, Provocraft Holiday Stack, Stickles Glitter, SU Ballet Blue ink, Organdy Ribbon, Inkadinkado Christmas Sentiment stamp set


Card Details: Stickopotamus Vellum StickersSnowflakes, SU Cardstocks: Ballet Blue, Bordering Blue, Bashful Blue, Whisper White, Provocraft Holiday Stack, DCWV Designer Paper, Fiskar "Scallop" Scissors, Stickles Glitter, 1" and 1 1/4" circlue punches, JoAnn Brads, Organdy Ribbon


Friday, October 12, 2007

First Non-Rubber Stamping Card!


Hey Everyone! Here are cards I made for this new transition to my blog sites. I made these paper-craft (non-rubber stamping) cards last night. This is a FABULOUS way to reduce your scraps of cardstocks that you have piling up in your folders or drawers. The measurement of the tree is outlined on the sketch below!

To decorate the tree, I just used stickers from Stickopotamus. If you don't have ornament stickers, you can also punch out circles and squares using paper punches to create ornaments. I'll create a card next time using punches. I did do a little rubber stamping on the cards because I didn't have a sentiment sticker that fit into my design so I rubber stamped the sentiments.


If you haven't read my post regarding changes on my blog sites, click here. It'll explain what I'll be doing on this blog site as well as Stampin Inspirations. If you are a rubber stamper, visit Stampin Inspirations . . .I posted a few rubber stamped cards this morning! Check it out.


Card Details:

Paper: (1st card) DCWV Textured Cardstock, SU Cardstocks: Real Red, Old Olive(2nd card) DCWV Textured Cardstock, SU Cardstocks in Old Olive, Bashful BlueAccessories: Stickopotamus Stickers - Christmas Tree, Trim it Up Gold Mettalic Cord, JoAnn BradsSentiment stamp: Inkidinkado


Wednesday, October 10, 2007

Flash Back Wednesday - Christmas Card


Good Afternoon Everyone! This card is a card I made last Christmas and I wanted to bring it to the present. Why? Well, I like the layout so I decided to post it rather than creating another card. I actually didn't make a sketch of this card when I posted this card last year.

Someone asked me where I get my sketches. Well, I get it from me. Ha! I actually make the sketches after I make the card. I don't follow my own sketches. I usually create a layout by fitting the images and elements like a puzzle. I usually place the sentiment last because some sentiments just don't fit nicely into the puzzle.

When I create a card, I'll stamp an image and from there, the design evolve. It's all about the image. The rest of the stuff are fitted in. . .again, like a puzzle. When I'm done and I've taken a picture of the card, I then create a sketch and post it for all of you to use if you care to.

Until later folks!!

Sunday, September 16, 2007

Daily Special - Christmas in September

Yo! Everyone!! Check out this stamp. It's pretty funky. I had bought it on Ebay long, long ago and I initially thought wow, what a weird group of snowmen. . .especially, the first one. . .her hair looks rather "fried". . .she needs to see her hairdresser.

It's a stamp from some obscure company. I initially thought to myself . . ."why did I buy this stamp?" but it's grown on me. . .I actually think the snowmen are cute now and really glad I bought the stamp.

I colored the images using the Prismacolor markers then applied SU Crystal Effects. Do anybody still use dimensional glazes on their cards like Crystal Effects? I love the stuff. I like how it makes the images 3D looking and shiny. It's also a good way to cover ugly coloring. Haha! If your coloring turned out a little messy, just add a dimensional glaze over it and it actually looks okay after you apply it. To create the 3D snow, I used Liquid Applique and puffed it up using a heating tool. Before heating it, I added glitter to it while it was still wet. It's amazing that the little things you do to a card can add "excitement" to what would have been otherwise a drab looking card.


Card Details:

Stamp: Imaginations 0841, Inkadinkado Christmas stamp set
Ink: Prismacolor Markers, SU Pixie Pink
Paper: DCWV Square Scallop cardstock, Provocraft Christmas Stack, Mint (unknown) SU Whisper White, Pretty In Pink,
Accessories: Grosgrain ribbon, SU Crystal Effects, Liquid Applique, Clear glitter, JoAnn Brad, SU Ticket Corner Punch

Wednesday, September 12, 2007

Another Christmas Card


Good Evening Everyone! This will be my last Christmas card for a few days. I'm just trying to stock up on my Christmas cards before it gets too busy and I won't have time to make them.

I wanted to create a simple design because I really like the designer paper and didn't want to cover it up with too many layering. The stamp image again is by TAC. . .check out Jen's "Pieces of Me" if interested in TAC stamps.

I colored the image with Prismacolor Markers and applied SU Crystal Effects to give a 3D appearance. That's about it. I rarely make simple cards because I'm so accustomed to layering and adding all sort of stuff to them. I kinda like the simple look and it's much faster to make. It's also nice to show off the paper rather than covering it up all the time.

Hope y'all are having a nice evening.


Card Details:
Stamps: TAC Gifttags, Stampin Up Warm Words
Ink: Prismacolor Markers
Paper: SU Old Olive, Taken With Teal, Provocraft Holiday Stack
Accessories: JoAnn Brads, SU Crystal Effects

Tuesday, September 11, 2007

Clarification of My Previous Post

Good Evening Everyone! Here's a card I made this afternoon using "The Angel Company" stamp set called "Gift Tags". I bought the stamps from Jen at "Pieces of Me" who is a consultant for TAC. The sentiment is by Inkadinkado.

I colored the Santa image using Prismacolor Pencils with Gamsol and colored the frame with Prismacolor Markers and applied Liquid Applique on to Santa hat. I also applied Crystal Effects by SU on to the candy stripe framing around the Santa. The rest of the card are basically layering and adding a few design elements.


I removed the two previous commentaries I posted because I was concerned that I may offend people. People sometimes are sensitive to controversial subjectsand are easily offended. I've seen a bunch of blogs that discuss sensitive subjects and people become really passionate about it.

I recently visited a blog site and the owner basically dissed Stampin Up. Interestingly, the person began to receive "hate" comments which I found to be quite ridiculous. . .sheesh, it's about rubber stamps. There's no need to hate. Anyway, I'd hate to receive hate mails.

Card Details:


Stamps: The Angel Company Stamp, Inkadinkado
Ink: Prismacolor Pencils with Gamsol and Prismacolor Markers
Paper: Provocraft Designer Paper, SU Garden Green, Real Red
Accessories: Box of ribbons (Christmas), Fiskar "Scallop" Scissors, Liquid Applique, SU Crystal Effects, SU Round Tag Punch