This blog site focuses on cards and projects utilizing materials and tools from various scrapbooking and paper craft companies.
If you are interested in cards and projects made with rubber stamps from various companies, please check out my other blog site "Stampin' Inspirations".


Come and join the Christmas Group Site on Paper Craft Planet
Click on the banner below


Showing posts with label Tags. Show all posts

Wednesday, October 10, 2007

Random Card - Project Reduce Scraps


Whoa! Holy cow that's bright. . .yeah, I hear yah!! LOL! I'm just trying to use up my scrap pile and well, I have a whole lot of orange cardstock to use up. Did you see my cardstock scrap pile? If not, scroll down and you'll see that I have a lot of scraps to use up.

Despite it's brightness, I like the card because I feel "happy" when I look at the card. I mean you can't help but feel happy with all the bright colors.

The front of the card is actually a pocket with the tag inserted.

This is the card with the tag removed. It's pretty plain without the tag but it was fun to create a pocket in the front of the card.


Card Details:
Stamps: TAC, Studio GPaper: SU Only Orange, DCWV Glitter Stack
Ink: Prismacolor Markers, SU Pumpkin Pie
Accessories: 1" circle punch, SU designer label punch, JoAnn brads, 1 1/4" and 3/8" square punch (photo corner), Making Memories Ric Rac Ribbon, SU Ticket Corner Punch

Saturday, August 25, 2007

TIC Day #8 - Tuesday's Inspirational Challenge - Tag-A-Long Submissions and Samples

If interested in participating in this week's challenge, click here for the details. Tomorrow is the last day for submissions. Random drawing of the winner will be chosen on Monday!

Hey check out Jen from "Pieces of Me" CD shaker card and matching tag. I'm glad she decided to try out my CD shaker card tutorial. . .she did an awesome job. Isn't the mouse a cutie? I love this stamp from Whipper Snapper! Well as always, Jen did a fabulous job on my challenge. She always come through with wonderful creations!
Thanks Jen for participating in this week's challenge. It's always fabulous to see what you come up with!!

Here is Jen's fabulous matching tag! Love the scallop circle!


Good Morning Friends! Check out Wendy's awesome submission for this week's TIC. Fabulous! I believe this is Wendy's first attempt with my challenges. I'm glad she decided to participate. She made this card and tag for her MIL. . .how sweet of her to give such lovely creations to her MIL.

Wendy has an awesome blog site called "Crafty Butterfly Stamping Blog". Be sure to stop by and check out all her awesome creations.

Thank you Wendy for participating in my challenge! Your creations are a wonderful addition to many beautiful submissions I received so far!

Here is Wendy's fabulous tag! Beautiful!!


This is a card and tag I created for this week's challenge. I decided to do a Thanksgiving card because Thanksgiving is also around the corner and I need to get started on that too. Sheesh, I feel pressured!

Anyway, I colored the image using Prismacolor pencils with Gamsol. Nothing much else to the card but using different designer pattern paper and piercing dots to the edge.


Here is the matching tag!


Card Details:

Stamps: D.O.T.S. Pumpkin Patch Fun, Hero Arts Happy Thanksgiving Border
Paper: SU Pumpkin Pie, DCWV Fall Stack cardstock, DCWV Fall Stack Designer Paper
Ink: Prismacolor Pencils with Gamsol, Prismacolor Markers
Accessories: Organdy ribbon, Hemp cord, JoAnn brad, SU Crafter's Tool Kit (paper piercing), Provocraft Scissors


**********************************************************************************

Hi Everyone! Here's a submission I received for this week's TIC Day #8 - Tag-A-Long Challenge. If interested in participating in this week's challenge, click here for the details.

Check out the lovely card and tag submitted by Hulda of "Aunt Scrappy". Wow, I love them! I love the designer and embossed paper that she used. I also love the non-traditional colors she used. It's beginning to feel like Christmas is right around the corner. Be sure to drop by Hulda's blog site and check out all the lovely creations she has on her blog site.

Thank you Hulda for participating in this week's challenge. I always love your submissions!


This fabulous card and tag is from Malieta! Awesome! I love her creations. She did a wonderful job on the coloring of the House Mouse image. She recently began using Prismacolor Pencils with Gamsol and she did a superb job. I love how she tied the ribbon. Isn't it great! Be sure to drop by Malieta's blog site "LIfe's Simple Pleasure" and check all her wonderful cards, projects, and scrapbook layouts.


Here is Malieta's fabulous tag! Thank you Malieta for once again participating in my challenge. I really appreciate seeing your work!


Drop by my Stampin Inspirations blog site to see the other submissions for this week's challenge!

Here's a Christmas card and tag that I created for this week's TIC Day #8. I colored the image using Prismacolor Markers, added clear Stickles to the ear muffs and snow cap and I applied Crystal Effects to the Scarf and snow cap to give it a 3D effect.


Here's the matching tag for the card.


Card Details:
Stamps: JRL Design "Peter Penguin, Inkadinkado Holiday Collection, SU Lace Snowflakes
Ink: Prismacolor Markers
Paper: Provocraft Holiday Slab V, DCWV Textured Cardstock Red and Green
Accessories: Provocraft Scallop scissors, Making Memories Swirl Clips, Grosgrain Ribbon, Santa's Workbench Ribbon, JoAnns Brads, Silver Metallic Cord, Clear Stickles, SU Crystal Effects, Crafter's Tool Kit (paper piercer)

Wednesday, August 22, 2007

TIC Day #8 - Tuesday's Inspirational Challenge - Tag-A-Long Sample

Hi Everyone! Well here's a Halloween card and tag sample I made for this week's challenge. I had planned to make more cards and tags but midday, I started to feel like I was coming down with a cold or something. I hope I feel better tomorrow.

Anyway, I thought I would make a Halloween card and tag instead of Christmas ones. Halloween is right around the corner so I need to hurry and make a bunch. I colored the image using Prismacolor pencils with gamsol and traced the outline with Prismacolor markers. I used the Sakura Souffle gel pen to create the dot/stitch design on the mattings. Nothing much else to the card but layering the layout.

I hope y'all will participate in this week's challenge. I would love to see your work!

Here's the matching tag. I made this tag in a horizontal orientation.

If interested in this week's challenge, click here for the details.


Card Details:


Stamps: D.O.T.S. Trick or Treat Trio, SU Sweeter Treaters
Ink: Prismacolor Pencils and Markers, Sakura Souffle Gel Pen
Paper: SU Only Orange, DCWV Fall Stack, DCWV Fall Cardstock
Accessories: SU 1 1/4" and 1 3/8" punches, Making Memories Ribbon, Sizzix Die, Fiskar "Cloud" scissors


Tuesday, August 21, 2007

TIC Day #8 - Tuesday's Inspirational Challenge - "Tag-A-Long"


UPDATE OF THIS POST

Hi Everyone!! Okay. . .I came up with an EASY challenge! I think my past challenges were a bit too challenging at times and I decided to make this week's one a useful one as well as easy.

Because I've been making Christmas cards with a matching tag for the past few days, it prompted me to turn it into a challenge. Why? Well, my challenges for y'all is also a personal challenge.

I need to make more of these cards with matching tags, especially in preparation for Christmas and the holidays. Many times when we give a card to someone, it's usually accompanied with a gift and if there's a gift, you need a tag. . .right? Well, this is a great opportunity to create a card with a matching tag.


To be honest, I come up with challenges that I want to participate in. I know. . .I can be pretty self-centered. . .:) so with that said, this week's TIC Day #8 is titled "Tag-a-long"

Here are the rules:

1. Make a card of any design or theme. It don't have to be a Christmas card. It can be a birthday card, baby card, whatever. . .

2. Create a tag that matches the card.

3. The tag has to have the same elements as the card. No new elements can be added to the tag that the card don't have. You don't have to use all the elements of the card but you just can't add any additional elements to the tag. Got it? For example, you must use the same colors, papers, materials, ribbons, whatever that the card has. You can't add additional embellishments, color combo, techniques, etc. to the tag. The point is the tag has to match the card.

5. The only added element that can be used on the tag that the card does not have are the words (TO: and From:).

6. Card and tag can be of any size or shape.

7. Card and tag don't need to be rubber stamped. You may paper craft, draw, add embellishments, paper piece whatever you want to do is acceptable.


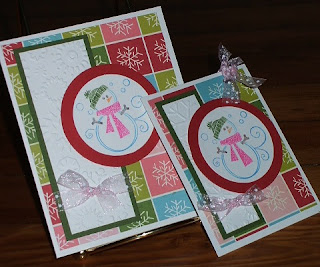
You may send your submission as one picture with the card and tag together as shown to the left or send 2 pictures - the card and the tag. as shown in my other samples.

Please email your submission to me at lbmcd66@hotmail.com or comment on this post with your blog address. Please include your blog address or gallery so I can add the link to your website.

Last day of submission is on Sunday. Cards made with Stampin Up images will be posted on my Stampin Inspirations blog site and all others will be posted on Card Inspired.

The challenge will be posted on both of my blog sites. I will be giving out a small prize and a winner will be randomly chosen on Monday.

Okay, everyone. . .this challenge is easy so I am expecting you to participate! Most of all, HAVE FUN!!


******************************************


Good Morning Everyone! I can't believe it. . .I actually made a card before 10 p.m. Today's Daily Special is "Christmas in August". Check out my Stampin Inspirations blog site. . .I also posted Christmas cards on that site.


I'm working on Christmas cards just to get a head start. I'm still debating on what TIC - Tuesday's Inspirational Challenge - I'm going to do for this week. I'll post it sometime this afternoon or this evening.


I'm heading out to lunch with a stampin' friend today and I wanted to post a card before I left. We're going to eat at a Thai restaurant. Yummy! Anyway, I remained focus, sat down and remained put and finished up the card. Many times I'll start on a card and end up doing other things and don't finish it until late at night.


Nothing much to this card. . .I stamped the image with Versamark on to red cardstock, applied glittery embossing powder, then heat embossed it. I did the same with the sentiment. The rest of the card is basically layering the different elements.

Anyway, hope y'all have a wonderful day.


Card Details:

Stamps: Anita's, SU Frosty, Inkadinkado Holiday Collections
Ink: Versamark
Paper: Red, White, Green (brand unknown)
Accesories: SU Glitzy Green Embossing Powder, Santa's Workbench ribbons, Crafters Tool Kit (paper piercer), grosgrain ribbon, SU Ticket Corner Punch

Sunday, June 24, 2007

TIC Day #1 - Tag Made With My Scraps


Just another tag I made using scraps that I had in a bag. I have a lot of left over stuff that I sort of put in a bag. You know, open packs of stickers, cut up tags, pieces of ribbons, etc.

The flower was created from a flower die cut and I stamped swirls on it using SU Vanilla Craft Ink, the square at the back of the flower is a metal tag, the sentiment was an embellishment I created by printing on scrapbook paper. The ribbon is by Dashes, dots, and checks. The stamped background is from the SU "Flower Fest" stamp set. I stamped the image using white craft ink and colored the flower with pastels.

This tag fulfills the TIC - 5 Layers Minimum requirement. It has 9 layers. Today is the last day to submit your TIC card so hurry! I'll continue to accept submission until 12 midnight.
Hope y'all are having a wonderful Sunday!!

Saturday, June 23, 2007

Daily Special - Tag Time - Tag with Pocket


Today's Daily Special is "Tag Time". On Stampin Inspirations I created a tutorial for creating a No-Brainer Tag Pocket. This is the same tag pocket but instead of using eyelets to secure the pocket, I sewed stitches around the pocket to secure it.

I punched a half circle on the front of the pocket so that flower can slide in place to be revealed in front of the pocket rather than tucked inside of the pocket. Check out the picture below. Do you see how the pocket don't have the flower when the tag is removed. It's just a fun way to reveal the embellishment when the tag is inserted into the pocket.

If interested in creating a really easy tag pocket. . .

This tag also fulfills my TIC - 5 Layers Minimum. This tag has a total of 6 overlapping layers!!


Monday, March 05, 2007

Daily Special - Anything But Cards - Chipboard Coaster Tag Pocket

Today's Daily Special is Anything But Cards - Chipboard Coaster Tag Pocket. I made this for a "chipboard" swap that I had joined. I wanted to make something different and a little more on the elegant side as opposed to my typical cutie projects.

How did I make this tag holder? Here's how:

Material

Two 4x4" chipboard coasters
Designer Paper (Cut two 4x4")
Decoupage
Large scallop tag (you can make your own tag to fit the pocket
Coordinating colored cardstock 4 x 8 1/4"
Ribbons
Hole Puncher or paper piercer
Embellishments
Stamps
Sanding Block
Ink pad

Instructions:

  • Glue the designer papers on to one side of each of the coasters using the decoupage
  • Sand the edge using the sanding block
  • Distress the edge with the desired ink
  • Decoupage the top of the designer papers
  • Glue the coasters side by side on to the 4 x 8 1/4" cardstock with the designer paper facing up
  • Fold the cardstock in half with the designer paper facing out. This will create a pocket for the tag
  • Punch 4 holes on both coasters on the left and right side. Due to the thickness of the coasters, you may need to use a paper piercer to punch the holes.
  • Thread the ribbon through the front to the back side of each coaster, cut and tie the ribbon. Do this for each hole on both left and right side of the tag holder
  • Design your large tag as desired
  • Insert the tag into the coaster tag pocket

That's it! Below is how the tag looks outside of the tag pocket. Try it out! It's quite fun to make!


Until later. . .

Friday, January 05, 2007

Friday's Tag Time 1

It's tag time! Ahhh, I actually posted a daily special on the day it suppose to be posted. I was free today to make these tags! Woohoo! Tags are great because they can be used for various purposes such as gift tags (obviously), embellishment to your cards, scrapbook pieces, or even as a book mark. . .yes, book mark. . .book marks don't have to be the traditional length. Even the small tags work just as well as the regular size book marks.

Tags come in various shapes and sizes. Next week I'll make a few using different shapes. Again, if you email me with your creation, I'll add your samples to this post. Enjoy!!

The following tag is a pocket tag. As you can see in the picture, you can insert a note into the tag pocket

This tag is a fairly large tag - 2 1/2 x 5". The background was made with scrapbook paper and the flowers are prima flowers attached with brads.

Creating tags for Valentines is a great way to say "I love you". The smaller tag is 1 3/4 x 3".