This blog site focuses on cards and projects utilizing materials and tools from various scrapbooking and paper craft companies.
If you are interested in cards and projects made with rubber stamps from various companies, please check out my other blog site "Stampin' Inspirations".


Come and join the Christmas Group Site on Paper Craft Planet
Click on the banner below


Showing posts with label Template. Show all posts

Monday, June 16, 2008

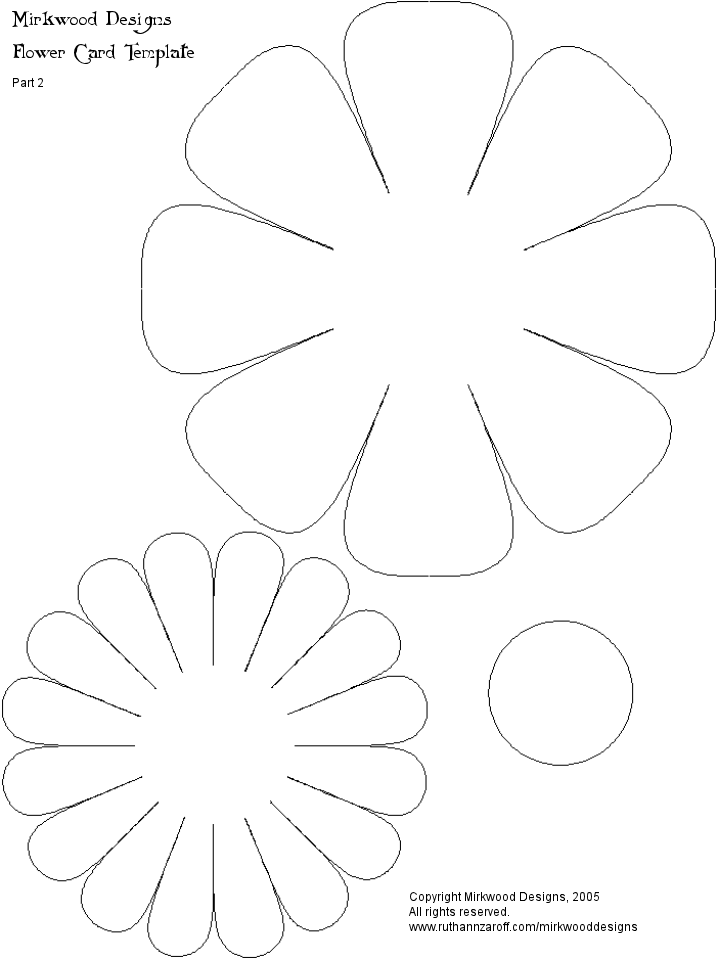
Flower Card Template


Hi Everyone! I had cut out a bunch of designer paper using the template above a few weeks ago using the template above with the intention of using them for a mini scrapbook album. I already created the album and I had a bunch of left over flowers so rather than using them for another mini album, I decided to create cards with them. Above is one of the cards I made. I have a few more that I need to create a card for so don't be surprised if you see more of this flower card on future posts.

To create the card, I took a 12 x 6" cardstock and folded it in half. I traced the template on to the folded cardstock leaving the folded part of the cardstock intact. I took my flower shaped designer paper and adhered it on to the flower card base. That's basically it.

I decorated the card using a large prima flower by Deja View and attached a flower designed chipboard and sticker sentiment. Anyway, check out the template if you want to recreate this flower card. The card fits into a 5.5 x 5.5" envelope. When printing the template, you may want to adjust the size by increasing the size on your printer program.
Just to let you know. . .the designer paper is by TAC.

Anyway, back to more card making! Until later, folks!

Saturday, May 24, 2008

Card and Purse Template

Hi Everyone! Sheesh, I haven't posted for a few days because my allergies have been driving me crazy. I can't even tell if I have allergies or a cold. . .they feel the same to me. It's really hard to craft when everything feels fuzzy. Argggh!

Anyway. . .I feel better today so I decided to make something. On Wednesday, it was my son's Senior Awards night and he was recognized along with other students for their effort in community service. Wow, the kids are sooooooo impressive. Throughout my kid's high school years, we emphasized the importance of community service and you know, as much as they give back to the community, they tell me that they feel really good about doing what they do and that is what is important.

My son is pictured with my daughter's best friend who is graduating this year. My daughter is still a junior but her friend will be leaving for UC Berkely in the fall. Wow, she is quite an impressive girl. She received several awards on Wednesday. She complimented my daughter in that she encouraged my daughter to achieve academic excellence and my daughter complimented her by encouraging her to participate in community service. What a fabulous combination, don't you think?


Anyway, I decided to make a card and a small goody bag to give to my daughter's best friend. It'll be a little sad for my daughter because both her brother and her best friend will be in college while she will still be in high school. I hope she'll cope and find a friend that will be as good as her best friend (I don't want to say her name because well, I didn't obtain permission to post her picture).

I know the card and purse is a bit busy but teenagers like bright funky colors anyway.

Here is the card. . .it's sort of hodge-podge but I thought it was a fun combination of colors. The designer paper is a scrap piece that I used to inspire all the colors of my card.

The paper is by K&CO. The ribbon is by Basic Grey and flowers are by Dejaview. The stamped background is a stamp from Heidi Grace and the sentiment is by K&Co.


Here is the mini purse that I stuffed with candy. Just a small goody bad. Teens love chocolate so I thought it was appropriate to stuff it with candy. LOL!

Here is a close up of the Prima flowers that I layered. I love layering embellishments. . .they look better in my opinion when they are layered and dressed up a bit.


This is the original template. I saved the template on to my computer but then I forgot to note the website that I got it from.

The template is by Kathleen McKinney but I can't remember if I got it from a blog site or a website. If you know Kathleen McKinney's site's address, can someone send me the link so I can add her site's link.

If you decide to use this template, when you print it. . .it may be a little large so you will need to set your printer to the setting "fit to page" or "copy" the image and paste it on to your publishing program and modify the size.

Template tip:

When you see a template online and you want to print the template directly on to your cardstock, a way to remove the lines and markings is to save the template on your computer, open up your "Paint" program and "erase" the lines and markings then save it as a jpeg or bitmap file.,


Here is the template without all the marking so you can print it directly on to your designer paper or cardstock so you don't have to cut it out and trace it. It's much easier and faster to print it directly on to your cardstock.

You then use the original template as a reference to score and fold the purse.

Click on the image and it will enlarge. It may look REALLY large but when you print it will adjust automatically and print to fit on a 8 1/2 x 11" cardstock. If it doesn't adjust and print on to an 8 1/2 x 11" cardstock, you may need to set your printer to "fit to page". The final size of the purse is approximately 3 1/4" squared.

Try it out!!

Hope y'all have a wonderful Memorial Day weekend.