Saturday, August 11, 2007
Thursday, April 19, 2007
Lookie, Lookie - Look at What I Bought Today - Prismacolor Art Markers
JoAnn has a lot of clearance stuff so if you haven't been there lately. . .I suggest that you go. You may find a lot of yummy stuff like I did.
I browsed over to the art section, looking to see if there's anything there that I may want to buy. At first, I didn't notice the little tags that said "clearance". There were a lot of them but I just didn't see them for some reason.
I looked down and at the very bottom, I noticed a clearance tag saying . . .(here's the good part). . .Prismacolor Markers Set of 24 regular price $89.99, now $24.99. WHAT! I had to check it several times to make sure it was correct. I've been wanting to buy the markers for such a long time but even with a 40 to 50% discount, they were too expensive. I didn't want them THAT bad.
Anyway. . .I went to the cashier to pay for my stuff and the markers didn't scan as a sale item. Well. . .I wasn't going to let that deter me. . .I ran over to the art section and took the tag off the shelf and showed it to the cashier and she was like "wow, I guess it is on sale". Yeah. . .you bet it is!!
I now know why it is sooooooooooooo expensive! The stuff is AWESOME!! I mean AWESOME. It's like no other marker. I hate coloring with markers. . .it soaks through the cardstock and leave all sort of uneven markings. Well. . .not Prismacolor Markers. I cannot even begin to tell you how VIBRANT the colors are. . .
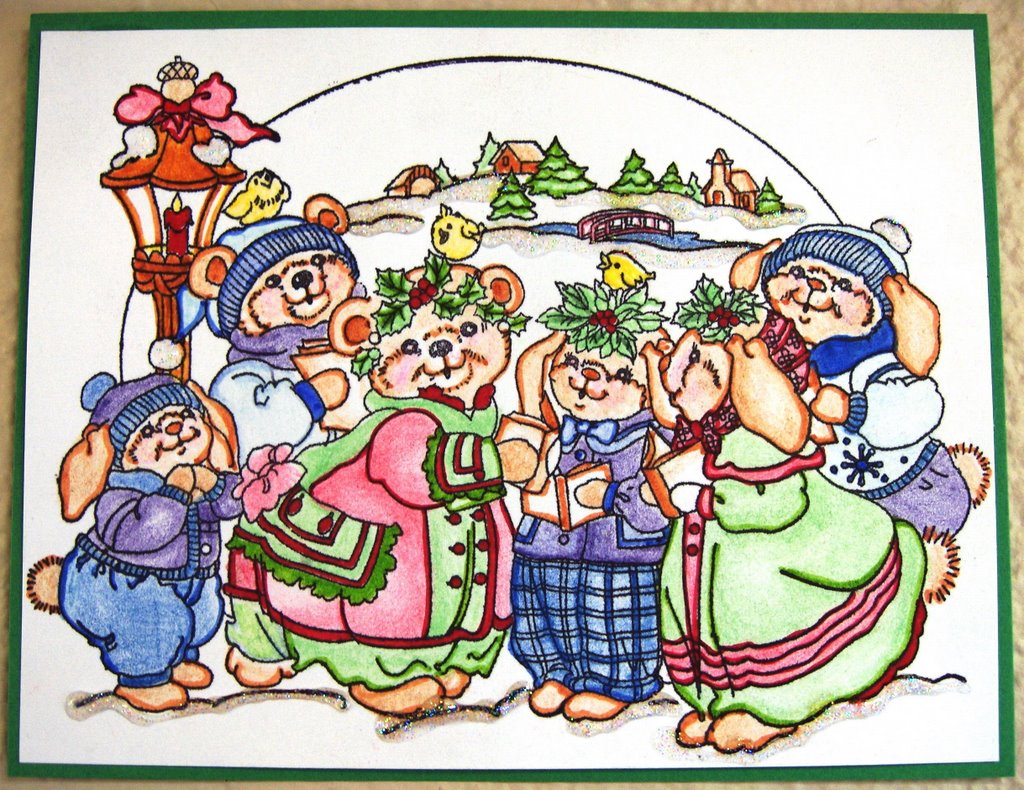
There is a drawback. . .if you like to shade and add highlights, you have to be a little artistically inclined. Thank God for the art classes I took in college. I bought a blender pen used for markers a while ago and that is how I added a bit of highlight to the bear. It's not really visible in the picture but there's shading and highlights in the coloring. The blender pen by Prismacolor removes some of the markers color. . .well, not remove it. . .sort of dulls it. The colors on the card are layered with adding and removing then again, adding color.
I decided I loved the markers so much, I went on Ebay and bid on the whole set of 156. Hopefully, I'll win it. I'll find out on Saturday. Wish me luck!!
Here's the sketch for the card:
Card Detail:
Stamp: CTMH
Paper: Stampin Up Positively Pink, So Saffron, DCWV Scrapbook Paper
Ink: Prismacolor Art Markers, Positively Pink
Accessories: Dots, Dashes & Checks ribbon, Hemp cord, JoAnn brads, Fiskar KidZors
Until later. . .
Posted by
Maria
at
5:59 PM
2
comments
Labels: Card Sketches, Cards, Product Review
Monday, April 09, 2007
Random Cards - Post Cleaning Cards
Yay! My craft is clean again! I decided not to re-organize it, just clean it. I was so happy to have a clean room, I was motivated to make a bunch of cards. In the process of cleaning, I found a bunch of images that I've colored in the past and stored for future use. Because my room was so messy, I didn't know where they were and yay! I found a bunch of already colored images for me to work with.
I colored the images using pastel on glossy paper and enhanced it with Stickle glitter. I feel pastels are the easiest coloring medium than any color medium BUT only when colored on glossy cardstock. Although I love coloring with color pencils with Gamsol, it's time consuming. Coloring with pastels on glossy paper is so much faster BUT because glossy paper is much more expensive than cardstock, it's best to use it with images that you really like.
I bought bundles of glossy paper from this seller on Ebay and I took it for granted that this seller would be around forever. She sold her glossy cardstocks in large bundles for a very, very cheap price. I'm really bummed that she closed her Ebay store. I can't find another seller who sells glossy cardstock at her price. In the past I used the glossy cardstock quite liberally but now that I no longer have that seller to buy from, I had to find an alternative method to color my stamped images.
By the way, my least favorite coloring method is watercoloring. The results are not vibrant enough for me and I really hate when the cardstock warps. I also hate having to wait for it to dry. The only time I watercolor is when I use Twinkling H20. . .for those who don't know what they are, they're little tubs of sparkly watercolor (watercolor mixed with mica powder) and the results are BEAUTIFUL. Unfortunately, they're EXPENSIVE. They run about $24.00 for a set of 12 of the small 0.5 oz tubs. Your local rubber stamping store usually have a few in stock. JoAnn or Michaels don't sell them. You can also find them online or on Ebay. Below is a picture of Twinkling H2O made by Luminarte, Inc.
Anyway, I really love the background paper I used on the two cards I made so I wanted to keep the layering to a minimum. I wanted the background paper to be a focal point more than anything else. It's scrapbook paper by DCWV called "Pocket Full Of Posies". It comes in a value pack and is sold at JoAnns. It's thick paper similar to cardstock, the patterns are beautiful and they're glittered. BEAUTIFUL!! Whenever they are on sale, I buy a stack of them. They sometimes are on sale for $9.99 for a stack of (48) 12 x 12 sheets. Below is a picture of the scrapbook paper by DCWV
I'm not going to give the card details on this card because I don't know the name brand of the stamp or the cardstock. The only detail I can give you is on the aforementioned background paper.
The sentiment stamp on the card to the left is a stamp by PSX and the metal embellishment is by Colorbok.
I'll do a tutorial on pastels on glossy cardstock sometime this week. There's nothing to it but I'll do a tutorial on it anyway.
Try out the sketches! They're very straight forward and simple layouts. I'll post the other cards I made later today! I also created another project using envelopes and I'll do a tutorial on it when I have a chance.
I did an envelope project a few days ago and posted the tutorial on my Stampin Inspirations blog site but forgot to note it on this blog site.
Click Here for the #10 Envelope Tag/Pocket Tutorial
Posted by
Maria
at
1:14 PM
1 comments
Labels: Card Sketches, Cards, Product Review
Friday, March 02, 2007
Product Review - Fiskars Clear Stamps
My product review is on Fiskars Clear Stamps which cost $12.99 at regular price at JoAnn. JoAnn had a 40% sale on all their papercrafting products including their rubber stamps and like a good shopper, I bought 4 of them as well as the large acrylic block. At 40% off, a set of stamps, which by the way has a lot of stamps, came out to approximately $7.00. In opinion this was an awesome deal.
I love the stamp designs. . .they were very cute and each set contains at least 2 background stamps and left and right side images of the same image, and at least 5 or 6 sentiments. Some of the sets contained at least 10 sentiments in various sizes.
The set also comes with multiple stamps of the same images. The purpose for this is the large acrylic block (sold seperately) is like a template in which you can place the stamps with a particular design in mind and rubber stamp multiple cards with the design template you created. I think this is such a wonderful concept. It's like a printing press.
Here are a few advantages other than what was already described:
- Storage. It takes a very little amount of space to store these unmounted clear stamps. Imagine being able to store a 100 stamps on one shelf. The image is printed on the plastic mat so you can easily put the stamp back on to the mat exactly as it was before you removed it.
- When stamping with clear stamps and clear acrylic blocks stamping is a breeze because you are able to see through the block while stamping and see exactly the placement of the image on your card.
- Removing and placing the stamp on to the acrylic block can be a hassle. I'm very impatient so doing this extra step is just that. . . an extra step.
- I found that like with any clear rubber stamps, inking of the stamp can be blotchy I believe because of the type of rubber that clear stamps are made of. The ink tends to bead, therefore, if you don't ink the clear stamp really well, the stamped image can appear fuzzy and blurry looking.
- The clear stamp is also thin and a bit soft so if you apply too much pressure when stamping, this smooshes the stamp and this is what also contributes to the fuzzy appearance of the image.
There are advantages and disadvantages but overall, for the price I think it's worth it. The previous card I posted and one of the boxes I created (posted the other day) were created using the clear stamps and I think they turned out pretty good.
I will buy more of them in the future. . .ummmmm, but only when they are on sale or if I have a JoAnn's coupon. Anyway, I never buy anything at JoAnn unless I have a coupon or it's on sale.
Until later. . .
Posted by
Maria
at
4:27 PM
2
comments
Labels: Product Review
Wednesday, February 28, 2007
Product Review - Sakura Souffle 3D Opaque Puffy Ink

Whenever I see I products I haven't used, I buy them just for the purpose of experimenting with it. I bought this pen set that I saw at JoAnn's which I've never seen on their shelves before. It's a 3-D Opaque Puffy Ink and I expected it to be "puffy" similar to Liquid Applique. Instead, the result is more of an embossed appearance. What I do like about it is that you can highlight areas of your image to appear embossed without having to deal with a heating tool. You can also write a message and it'll appear embossed. It works great both on dark and light colored paper and works best on non-porous surfaces such as plastic, vellum, acetate, coated paper and such.

I'll experiment a little more and see what it can do on other surfaces. Overall, I highly recommend it and it's sold at JoAnns. ****It's pricey so I would not recommend purchasing it unless it is on sale. Regular price is $19.99 - because there's only 10 pens in the set, it's not worth it for that amount but it's worth it at 40% off. Wait for the 40% off coupon before purchasing it at JoAnn's.
Posted by
Maria
at
8:31 AM
2
comments
Labels: Product Review
Monday, January 29, 2007
Daily Special - Product Review - Heidi Swapp Edge Distresser
One of the responders to my survey said she would like to see more "product reviews" and I agree. When I first started this blog, I did a few reviews but I haven't done one for a while.
Okay. . .if you like to distress your designs and giving them a shabby chic, aged appearance. . .Heidi Swapp's Edge Distress is a must.
I've used Making Memories, generic sanding blocks, etc. . .and man, it would take a lot of sanding to create what this little tool can do in one swipe. Forget sanding - this edge distresser is awesome!
You can find this distresser at various websites - just google "Heidi Swapp" and there's a bunch of online stores that sell it, as well as Ebay. Shop around but typically, it cost from between 99 cents to $1.49. Here's a great online scrapbook store - Croppin' Paradise - that sells a bunch of Heidi Swapp items including this edge distresser.
Several of my cards that have a distressed appearance were created using this edge distresser. My previous post (Daily Special - Anything but Cards - Buttons and Daisies) shows one of my designs using this distresser (the card box).
Try it out. . .I'm positive you'll love it!
Until later. . .
Posted by
Maria
at
1:03 PM
1 comments
Labels: Product Review
Thursday, January 04, 2007
Great Buy - Ribbons
Ribbons Ribbons!. I found this set of ribbons at Costco. It's wonderful! There's 40 ribbons at 4 yards each for a total of 480 ft. The cost of this set is $20.00. Wow, that's cheap for the amount of ribbon and the quality. Most of them are are satin or have a fabric feel to them. It's a great textural contrast to paper.
Posted by
Maria
at
8:39 AM
1 comments
Labels: personal, Product Review
Saturday, November 18, 2006
Product Review - Stampin Up Perfect Layers
Okay, I tested it out. The jury is still out on this one. It does work as promoted. I was able to cut a straight mat alongside my rubber stamped image. I'm not sure if just cutting with a paper cutter is actually more convenient.
I initially used a swivel blade because that's what I had immediately on hand. Well, it's not meant to be used with a swivel blade. It worked great with a regular straight blade BUT it's very important that you have a sharp blade otherwise, it's difficult to cut straight. Secondly, your mat has to be a good one. Like the blade, it won't cut a straight even line if you don't have a good mat.
Last of all, you will need to make sure the ruler don't move while you're cutting otherwise, like any situation that a blade is used, it'll cut along the edge of the ruler whether it's straight or not.
I do have to admit, my mat looked a lot more even compared to just cutting it with a paper cutter because it follows along the edge of your photo or image/cardstock. If your photo and image was crookedly cut, well your mat will be even alongside your photo or image but it'll be as straight as any photo or image you used as your guideline.
I rate it a 7. Worth the $20 if you really care to have an "exact" edge to your photo and image. Not worth it if a little uneveness don't matter much to you.
Posted by
Maria
at
5:54 PM
0
comments
Labels: Product Review
Pencil or Chalk (Pastels)
Until I discovered chalks or otherwise known as pastels, I watercolored or used colored pencils to color in my images. Although watercoloring is a fast and easy way to color stamped images, I do have a few issues using this medium. First of all, unless watercolor paper is used, the vibrancy and full effect of watercoloring is lost. Watercolor paper is ideal for watercoloring but it is expensive. If regular cardstock is used, layering the colors become a problem if a watercoloring medium is not used because using too much water on regular cardstock and heavy brushing of colors will eventually cause the cardstock to lose its integrity and start to cause "paper balls" - you know, little rough spots on the colored areas. Furthermore, the cardstock will warp when it dries. Yuck!
Colored pencils are a great way to color in images but it's VERY TIME CONSUMING and difficult to blend. I found that the most ideal medium to color in images is chalk because it's blendable and quick. The only drawback is unless you use glossy cardstock, it's difficult to blend and the color application is not consistent on regular matte cardstock. Blender pens can be used to blend the pastel but it gives the same effect as markers but less bold. Glossy cardstock can be expensive at times if you don't find it on sale and it's not heavily marketed as regular cardstock, therefore, difficult to find.
Here are two samples using the same images. The first one is colored in with chalk. To color in the entire image took me approximately 20 minutes. The 2nd image was colored in with pencil and it took me approximately 40 minutes to complete. I do take a long time coloring images because I blend the colors in thoroughly - I don't just color the image quickly. I use cross-hatch techniques and circular motion to blend the colors. As with both images, I highlighted the images outline with markers. See if you can tell the difference between coloring with chalk versus coloring in with pencil. Personally, there's only a fine difference between the two.
This was colored with pastels (chalk)
This was colored with Pencils
Posted by
Maria
at
11:37 AM
0
comments
Labels: Product Review
Thursday, November 16, 2006
Product Review - Versamark Ink

Versamark ink is a very versatile ink pad. Here are a list of techniques you can do usingVersamark ink.
- 1. Ink up the stamp of your choice with the versamark. Now, without cleaning the stamp, ink it up with a color of dye ink of your choice. Stamp, use the desired translucent or clear powder of your choice. And heat. This will not hurt your colored ink pad.
- 2. Batik technique — simply stamp your image using versamark on ultrasmooth white or confetti or some other light cs and then emboss with clear embossing powder. Let cool. Then gently wad paper into a ball or you could fold it into a small square for a different look. Unfold it and smooth it out. Place it on a towel and wet with water so the paper is very damp. Next ink your brayer with a kaleidacolor pad and brayer across the paper. The image will stay white while the ink will seep into cracks and the rest of the paper will have a batik look.
- 3. Brayer resist- this technique can be done with gold encore or versamark pads. Stamp the image onto glossy white card stock using one of these pads (you can also use matte card stock, but it works better with glossy). Gently wipe away the ink using a lotion-free tissue and small circular motion. Ink up your brayer and roll it over the paper. Wherever the versamark ink was stamped, the paper will resist the colored ink from your brayer.
- 4. Cleaner- rub on your craft & rubber scissors and it will keep them from getting all gunky with sticky stuff.
- 5. Clear emboss resist — use it with clear embossing powder on white, vanilla, naturals, confetti, kraft or any soft colored paper. Then sponge over the clear embossed image and watch it pop out.
- 6. Discreet journaling lines- although the versamark ink is sticky when applied, it dries like regular ink and looses its stickiness. It is acid-free and safe for scrapbooking. It works perfectly on all colored cardstock.
- 7. Emboss with your dye ink pads - ink your stamp with versamark, then stamp on a dye ink pad. Stamp and use clear embossing powder. Heat. You have now created perfectly coordinated with the markers and card stock. Don't forget to clean your stamp before re-inking on versamark pad or you will leave color on the pad.
- 8. Embossing brads — another great use for versamark... Take a brass fastener, pinch it in a clothes pin, dip the head in versamark, then dip in embossing powder, heat with heat gun, while powder is still wet, dip again in embossing powder & heat one last time. After it cools down you will have a nice enamel type colored coating on your fastener.
- 9. Embossing on glass- use the embossing buddy first, then use the versamark to stamp the image on a glass container, then emboss with detail gold or silver. Fill it with candy and tie a ribbon on it.
- 10. Embossing- use it as an embossing pad with any colored embossing powders.
- 11. Full coverage embossing — brayer with the versamark over a stamped image and use Stampin Up glassy glaze embossing powder. This will give you an all over gloss. Repeat till it is the thickness you want.
- 12. Glossy card stock resist- stamp on glossy paper and then brayer over the top with a kaleidacolor pad . This is called resist.
- 13. Heat & stick — use it with heat and stick powder to add glittery glitz or flocking to any project.
- 14. Poly shrink — use it on poly shrink projects. After you shrink your item press it into the versamark pad. Add the clear or transluscent powder of your choice and heat. Repeat till you get the thickness and look you want.
- 15. Poppin' pastels- stamp with the pad and then rub pastels over the it. The versamark will hold the pastel and "pop" it out.
- 16. Preserving children's hand prints — versamark is a great pigment ink to use on little kids' hands to make embossed hand prints, because it is clear and cleans up easily. Grown-ups should do the embossing of the sweet little hand prints since the powder can be messy and the heat gun is hot. But let the little ones watch their handprint turn to gold or silver before their eyes — they love it! And i'm sure you can imagine how the moms, dads, or grandparents will love their precious one's little handprint preserved in gold!
- 17. Pullin' pastels- rub your pastels over the dark card stock. Then stamp your desired image over the top of that. It will pull the pastel off and leave the image behind.
- 18. Reverse pastels- use brightly colored chalk to cover dark colored card stock, and then stamp over the chalked area. The ink will pull out the color of the paper from beneath the chalk.
- 19. Shadowing- this is a technique to use with kaleidacolor pads and word stamps but you can use it for anything really. Just stamp directly over your first image. Because you will seldom be exact you will make a shadow that gives the initial image a 3-d effect. You can even take it a step further and emboss with a translucent powder like pearl or iridescent ice.
- 20. Soot stamping — hold glossy card stock over an oil lamp with the flame turned up high to leave deposits of soot on it. Using a clean stamp, ink it with the versamark pad and then stamp on the soot. The stamp removes the soot and leaves a bit different effect than if you stamp with just the bare rubber. Be sure to clean stamp in between each time you stamp on your soot project so you won't get any of it on your vm pad. You must then spray with a fixative.
- 21. Versa mark and pearl ex powder resist. Use vera mark to stamp on dark colored card stock then brush over image with pearl ex powders. Seal with clear sealer.
- 22. Versamark and 2-step stampin'- stamp the image first with versamark pad and then with metallic (encore). Just shift a little bit when stamping the metallic ink. This creates a shadowed look.
- 23. Versamark is for kids!! Versamark is a great kid's inkpad. Just let the little ones stamp their little hearts out without ever worrying about an ink mess on those precious little hands or faces or table . . . Or anything else for that matter! It doesn't stain the wood on the stamps either. Encourage your young ones to watch for the "magic ink" . . . Just a second of waiting and they will see the image magically appear. This is great for elementary students in a classroom sitting too.
- 24. Watermark- stamp it on paper and you will have a watermark. This is very subtle, but lovely, on black white or vanilla paper as well as all of the other colors.
Posted by
Maria
at
7:39 PM
0
comments
Labels: Product Review
Monday, November 13, 2006
Product review - White Cardstock
White Cardstock - Georgia Pacific
When I first discovered rubber stamping. . .well, I was "brand name" happy. I thought the only products that I could use had to be a brand that is related to rubber stamping. Well, I learned a few things through my journey in the rubber stamping world.
Walmart. . .yes, Walmart is a great source for rubber stamping and scrapbooking products. They are limited in what they sell but they do sell a few items that are worth taking a look at.
Did you know that many brand name companies sell their products to Walmart and sometimes, repackage them with a different name or sometimes they don't. For example, EK success sells their products at Walmart and it's about 1/3 the cost of those sold at craft stores.
Brads and eyelets are sold at Walmart in 500 to 750 packs and cost less than $10.00. I believe I bought a 750 pack for $6.50. Making Memories sell their multi-pack of 600 eyelets for $19.99 at Joann. Okay folks, who cares what brand of eyelets you use on your cards. . . .an eyelet is an eyelet unless you are looking for a specific color. . .then who cares, right?
Anyway. . .back to my product review. . .
Walmart carries a ream of white cardstock by Georgia Pacific (ream of 150 - 8 1/2 x 11 sheets) that are 110 lb weight for $6.00. Unless you are planning to watercolor, this cardstock looks and feels like any other cardstock sold at the craft stores that are twice to 3x more expensive. At Micheals and Joann, a pack of 50 sheets cost about $4.99 and trust me, I can't tell the difference. . .as a matter of fact, the ones sold at the craft stores - are thinner and of lesser quality.
You can do light watercoloring on this cardstock because it's heavy enough to do so but if you are planning to layer the colors and use water heavily I don't recommend doing so on this cardstock. Single layer watercoloring is fine - it won't warp the paper once it dries and the integrity of the cardstock remains intact.
Check it out when you have a chance! Believe me, you'll never buy plain white cardstock at the craft store ever again.
Posted by
Maria
at
6:29 PM
0
comments
Labels: Product Review


