Daily Special - Technique Day - Joseph's Coat
I'm doing Tuesday's Daily Special - Technique Day . . .well, because I wanted to. I'm not following the schedule anyway as much as I would like to stick to my own schedule. I've never been an organized person. I have at least 4 organizer/daily planner and I plan on a daily basis but never, ever follow my own plans. I'm not sure why I have a planner - it's sort of a fetish of mine. . .I buy journals, planner, organizers but never use them. I have a dozen journals that I've written entries for about a week and I'll buy new ones. Isn't that weird?
Anyway, this technique is called "Joseph's Coat". I'm not sure why it's called that. I've been using my brayer a lot these days! Here is another variation of the previous brayer technique that I posted several days ago.
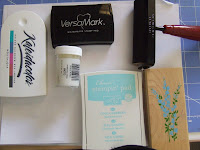
Materials
Brayer
Spectrum or Kaleidocolor multi-color dye ink pad
Stamp
Embossing buddy (not shown in the picture)
Embossing tray
Clear embossing powder
Single colored dye ink pad (darker than the colors on the multi-colored dye ink pad)
Versamark
White Glossy Cardstock

Step 1 - Ink your brayer with the multi-colored ink pad and roll it on to the glossy card stock covering the cardstock completely. You may have to repeat reinking and rolling the ink several times.


When done, you should have a rainbow colored background similar to the photo below

Step 2 - Rub the embossing powder over the colored cardstock (not pictured), ink your stamp with the Versamark ink and stamp on to the colored cardstock .

Step 2 - Rub the embossing powder over the colored cardstock (not pictured), ink your stamp with the Versamark ink and stamp on to the colored cardstock .
Step 3 - Apply clear embossing powder and shake off the excess then heat emboss. As a note. . .the embossing buddy in step 2 prevents excess embossing powder from sticking to anything else but your stamped image.


Step 4 - Ink a clean brayer with the single colored dye ink and roll across the embossed image. Continue to ink and roll over the image and cardstock until completely covered. In this case, I didn't use a dark enough single colored dye so a little bit of the multi-colored ink continued to show.


Step 4 - Ink a clean brayer with the single colored dye ink and roll across the embossed image. Continue to ink and roll over the image and cardstock until completely covered. In this case, I didn't use a dark enough single colored dye so a little bit of the multi-colored ink continued to show.
Step 6 - Finish up your card as you normally do.
That's it! Click on the title of this post for the SCS version of this technique.
Try this technique out yourself. Experiment with various colored Spectrum or Kaleidacolor ink pads. It's a fun technique and your results are different each and every time.
Until later. . .


1 comment:
I love all of your examples but I actually like it using the ligther color on top. I will be trying that! TSF
Post a Comment